Availity Clearinghouse Functionality with Ankota Files
Overview
Availity provides clearinghouse services. Please note that in most states, Availity requires a paid account for most payers.
This article includes:
- Enrolling in Availity
- Automated Availity Claims Management
- Billing/Preparing the Availity 837
- Manual Upload Availity Claims Management
- Billing/Preparing the Availity 837
- Uploading Files in Availity
- Reviewing Files in Availity
- Remittance Advice Files
- Troubleshooting
Enrolling in Availity
In order to successfully use Availity's clearinghouse services, you will need to complete the following steps:
- Enroll with Availity
- some payers are free
- some payers, such as Aetna, require a paid account
- Request an Ankota specialist configure your environment for Availity for the desired MCO
In order to have automated SFTP transfer to Availity (as opposed to manually uploading your 837s), you will also need to get a user name and password from Availity and share them with Ankota.
To create them:
- Log in to Availity Essentials
- Click Claims & Payments
- Under EDI clearinghouse, click FTP and EDI Connection Services
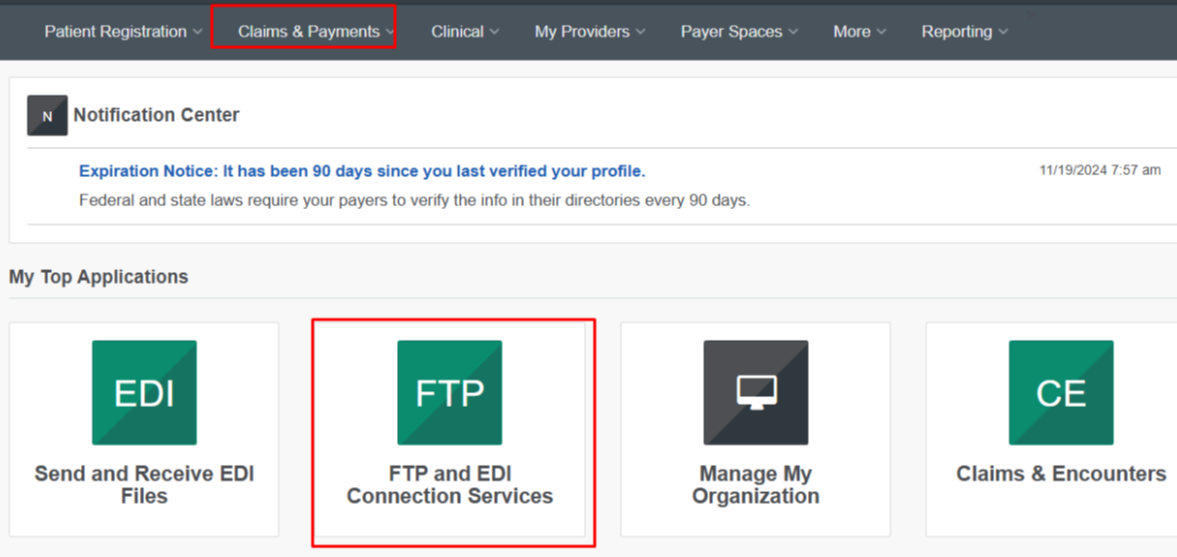
- Click Manage Your FTP Mailbox
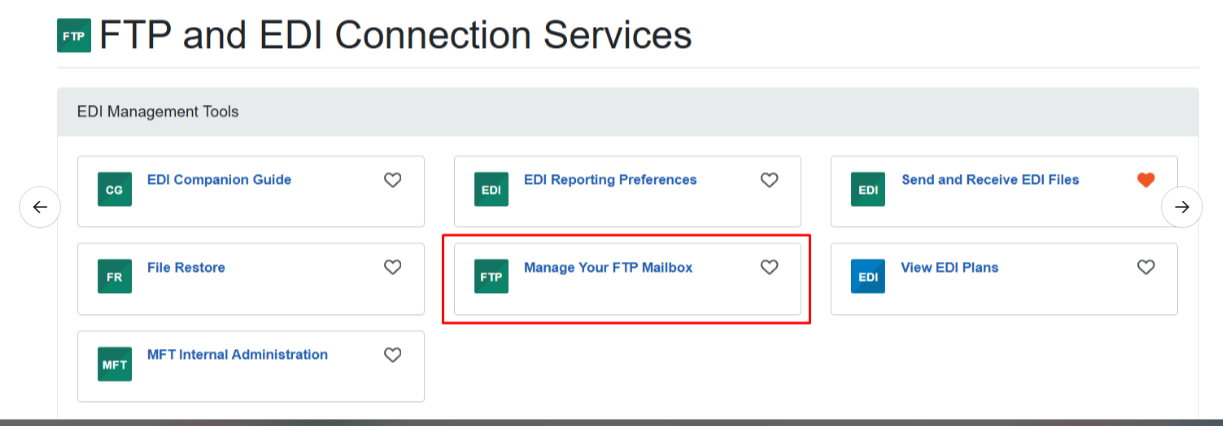
- Select your organization (may automatically populate)
- Create a user name and password
- Create the account
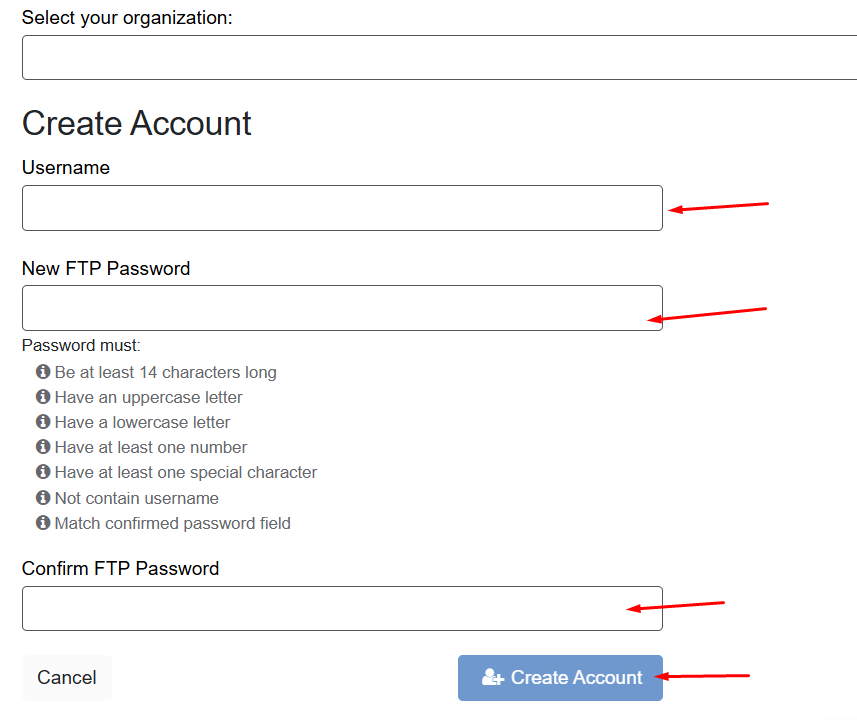
- Provide Ankota with the user name and password
Automated Availity Claims Management
Billing/Preparing the Availity 837
Customers can sign up for automated file transfer to Availity, speeding up the data delivery process with Availity. Once this is set up, data transferral is automated upon billing. Rejections must still be managed.
To ensure successful data transfer:
- Make sure all client and caregiver profiles have the necessary information (client address, client date of birth, IDs and full names for both client and caregiver, etc.)
- Complete billing as usual in Ankota
- After ensuring visits are closed, review the Visit Approval Dashboard, calculate billing, and complete draft invoices, the visits are ready to be exported
- Ankota will export visits once the invoices are completed (drafts are not delivered to Availity)
- Responses will be automatically received and uploaded in Ankota
- Manage rejections as needed.
If you are not already set up for automated file transfer with Availity, contact Ankota.
Manual Upload Availity Claims Management
Billing/Preparing the Availity 837
Customers can alternately manually upload their 837 files to Availity, and manually review response files in Availity.
- Make sure all client and caregiver profiles have the necessary information (client address, client date of birth, IDs and full names for both client and caregiver, etc.)
- Complete billing as usual in Ankota
- After ensuring visits are closed, review the Visit Approval Dashboard, calculate billing, and complete draft invoices, then click Export Merged Health Care claim to download the file
- Save these files
- Upload the files as outlined below
Uploading Files in Availity Manually
To upload your Availity claims:
- Open your Availity portal and log in (apps.availity.com)
- Click Claims & Payments
- Click Send and Receive EDI Files
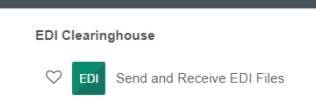
- Click Submit
- Click Choose files and select the file you downloaded earlier from Ankota
- Upload the file to the Send Files folder
- SAVE THE SUBMISSION CONFIRMATION ID in case of errors (easier to follow up with Availity support)
If the process above does not match your screen, try clicking EDI File Management --> Send and Receive EDI Files to get to the screen with the Send/Receive file folders. Alternately, check out Availity's walkthrough.
Once files are uploaded in Availity, you will need to wait for response files.
Reviewing Files in Availity
To review Availity claims responses, click the Received folder, then sort by Date so that the most recent response files are at the top. Then open the appropriate corresponding files. Typically, there are several corresponding files, one of which states in plain language what was accepted or rejected.
If using the 999 file, the data is coded. The IK5 and AK9 segments are the key to understanding what was accepted or rejected. Any time there are IK3 or IK4 segments in the 999, there is an error in the file. Segments are parts of the loop, indicated by tildes (~). Elements are parts of the segment, indicated by asterisks (*).
For example:
AK9*R*1*1*0*2~
- (R) - Acknowledges acceptance (A) or rejection (R) of a functional group, or (E) if there is an error but it is not rejected
- (1) - Reports the number of included transaction sets from the original trailer
- (1) - Reports the number of the accepted sets
- (0) - Reports the number of received sets
- (2) - Shows the syntax error code (see below for error codes)
The Accepted/Rejected/Error (A,R,E) data is also listed on the IK5 line.
Error codes for AK9:
- 1 Functional Group not supported
- 2 Functional Group Version not supported
- 3 Functional Group Trailer missing
- 4 Group Control Number in the Functional Group Header and Trailer do not agree
- 5 Number of included Transaction Sets does not match actual count
- 6 Group Control Number violates syntax
- 10 Authentication Key Name unknown
- 11 Encryption Key Name unknown
- 12 Requested Service (Authentication or Encryption) not available
- 13 Unknown Security Recipient
- 14 Unknown Security Originator
- 15 Syntax Error in Decrypted Text
- 16 Security not supported
- 17 Incorrect Message Length (Encryption Only)
- 18 Message Authentication Code failed
- 23 S3E Security End Segment Missing for S3E Security Start Segment
- 24 S3S Security Start Segment Missing for S3E End Segment
- 25 S4E Security End Segment Missing for S4S Security Start Segment
- 26 S4S Security Start Segment Missing for S4E Security End Segment
The AK1 and AK2 segments describe which 837 transaction failed. The IK3 and IK4 segments describe the incorrect data in the 837 transaction.
For IK3:
- IK3 01 Segment ID Code: Code defining the segment ID of the data segment in error. (segments are noted by ~)
- IK3 02 Segment Position in Transaction Set: The numerical count position of this data segment from the start of the transaction set.
- IK3 03 Loop Identifier Code: The loop ID number given on the transaction set diagram is the value for this data element in segments LS and LE.
- IK3 04 Implementation Segment Syntax Error Code: Code indicating implementation error found based on the syntax editing of a segment
IK3 errors include:
- 1 unrecognized segment ID
- 2 Unexpected segment
- 3 Mandatory segment missing
- 4 A loop occurs over maximum times
- 5 Segment exceeds maximum use (segments are noted by ~)
- 6 Segment not in the defined transaction set
- 7 Segment not in proper sequence
- 8 The segment has data element errors
- I7 Loop occurs under minimum times
- I8 Segment occurs under minimum times
IK4 errors include:
- 1 - Mandatory data element missing (elements are defined by *)
- 2 - Conditional and required data element missing
- 3 - Too many data elements
- 4 - The data element is too short
- 5 - The data element is too long
- 6 - Invalid character in data element
- 7 - Invalid code value
- 8 - Invalid date
- 9 - Invalid time
- 10 - Exclusion condition violated
- 12 - Too many repetitions
- 13 - Too many components
- I10 - Implementation "Not Used" Data Element Present
- I11 - Too few repetitions
- I13 - Implementation Dependent "No Used" Data Element Present
IK5 errors include:
- A - Accepted
- E - Accepted but errors were noted
- M - Rejected, message authentication code (MAC) failed
- P - Partially accepted, at least one transaction set was rejected
- R - Rejected
- W - Rejected, assurance failed validity tests
- X - Rejected, content after decryption could not be analyzed
If you have a direct portal to the MCO, check the information directly with the MCO.
Remittance Advice (835s)
835s are provided in response to some claims to Availity clients, depending on the relationship to the payer. If you receive an 835, you may upload it as usual.
999s
Here is more information on 999 Rejections:
| Submission Information | IK3 Error | IK4 Error | Error | Error resolution |
|---|---|---|---|---|
| N3*~ | IK3*N3*17*2310*8 | IK4*1*166*1 | N3: Address | Street address must be submitted |
| N4*~ | IK3*N4*18*2310*8 | IK4*1*19*1 | N4: City, State and Zip Code | The city, state and a valid 9 digit postal Zip code must be submitted |
| IK3*REF*30*2300*I6 | Missing Ref segment | A ref segment with the Payer Claim Control Number is required when ClM05-3 indicates this claim is a replacement or void to a previously adjudicated claim Note (Part A and HHH only) | ||
| NM1*82*1*SMITH*MaryA R ****XX*1111111111 | IK3*NM1*538*2310*8~ | IK4*4*1036*7 | NM1: Rendering Provider name segment | The trailing space after the provider name must be removed |
| NM1*IL*1*SMITH*JOHN*R***MI~ | IK3*NM1*886*2330*8 | IK4*9*67*1 | Identification Code is missing | The Subscribers Identification number must be submitted |
IK301: Segment ID IK302: Segment count of this data segment beginning with ST IK303: Loop Identifier Code IK304: Segment Syntax Error Code IK401: Position in the segment IK403: Data element syntax error code IK404: Copy of the bad data
Troubleshooting
If you successfully upload an Availity file and get an error response in Availity, view the error, make the correction and re-upload the Merged Health Care Claim (837) as needed.
If you upload a file and it does NOT show up in Availity, there is a strong possibility that either a) the file was uploaded to the wrong location or b) there is a bad character error. Assuming you are uploading to the correct location, review your data as follows.
To troubleshoot:
- First, download the Merged Health Care Claim for two separate clients that would normally bill to Availity. Be sure to download them as two SEPARATE files, not one
- Upload the two separate files separately (one at a time)
- Check and see if one or both uploaded successfully
- If one or both files uploaded successfully, then your settings are correct and you most likely have a data entry error on one client. Upload individual client Merged Health Care Claim files (837s) until you find the client that will not successfully upload.
- When you have found the client in error, review their profile. Do they have a correct Medicaid ID, authorization, etc.? Is their name, primary diagnosis code, or another key piece of data entered incorrectly?
- If you find the issue, correct it, then export a new Merged Health Care Claim, then upload it.
- If you cannot find the issue, reach out to Availity, or alternately, Ankota Support.
For Availity support calls, be prepared with:
- Your company name, NPI, and EIN
- Your Availity ID
- The client's name and ID that received the error
- The submission ID of the file you submitted
- The date you submitted the file (have the information on hand - they may ask for details, such as total invoice amount)
- The original EDI file, so that you can clarify the exact error with Availity Support