Calendar-Based Scheduling
Overview
Although scheduling can be performed by creating a new visit under Visits or by using the Create Visits tab under a client, the easiest method to schedule is by using calendar-based scheduling on the main Scheduling Board. For basic client scheduling, see below. For more on caregiver shift scheduling, see Caregiver Shifts in Ankota.
Creating Visits
To create a new visit or series of visits for any client or caregiver:
- Click on a blank space in the client or caregiver calendar
- A pop-up scheduling window will appear with the client or caregiver's name prepopulated

Work from the top down!
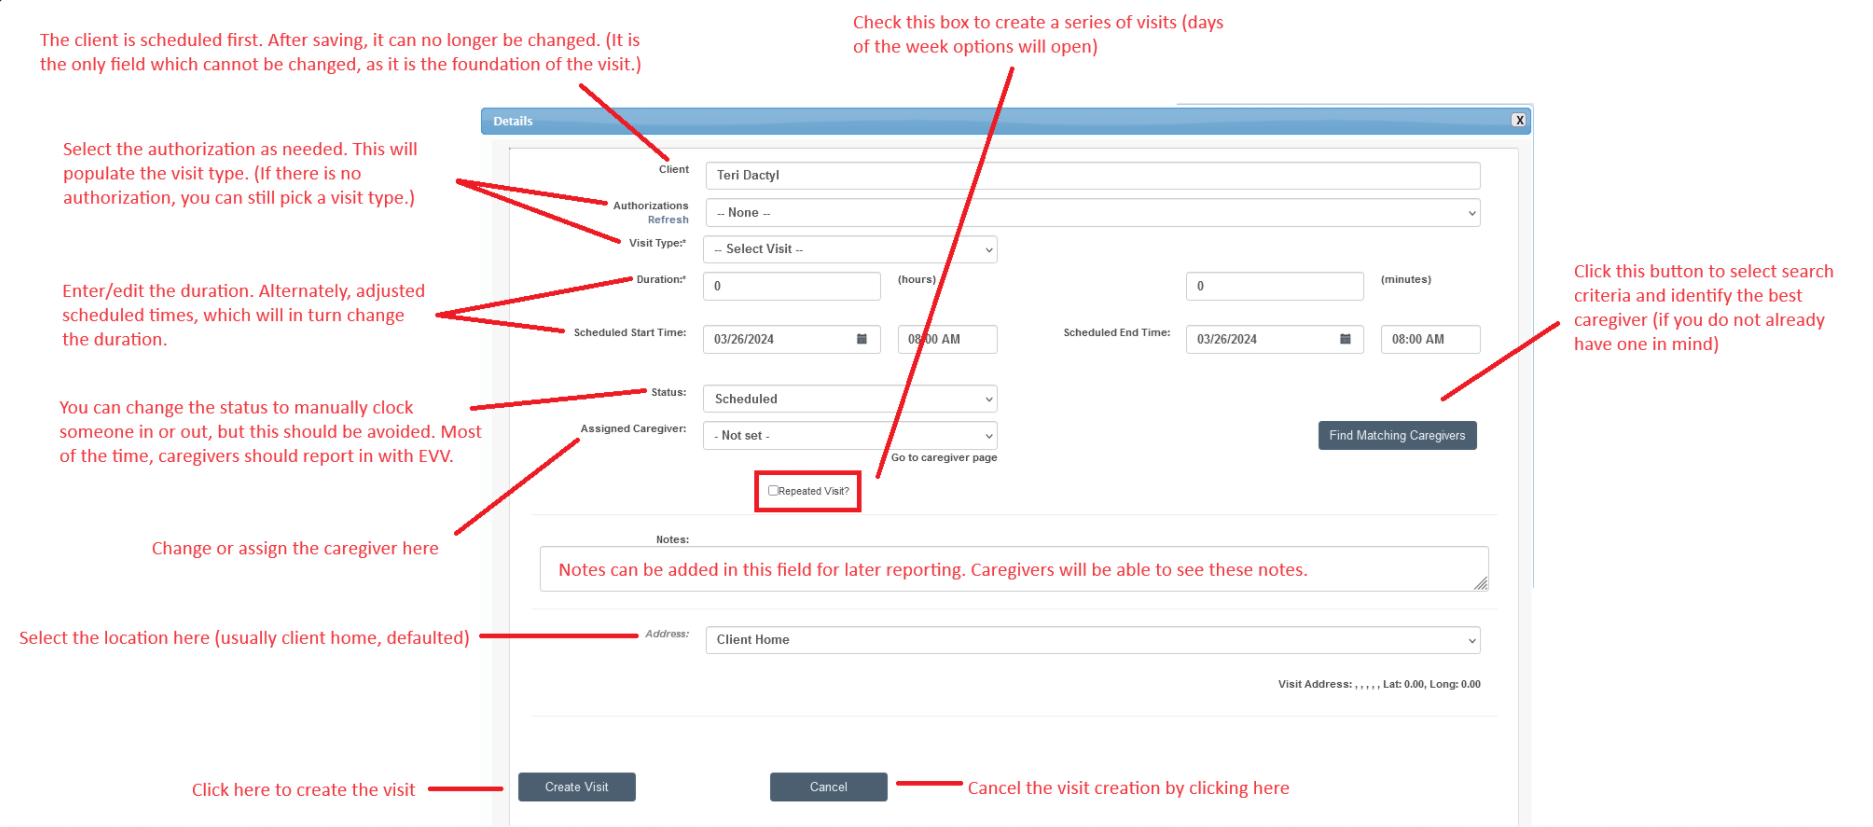
- If needed, assign a client name and the list of current authorizations will populate directly below that name. The client's name will have already populated if you are working on the Client Schedule Board
- Select the appropriate authorization. Sometimes authorizations will not apply, as with a supervisory or RN visit; it is fine to skip this as needed
- If you select an authorization, this will cause the visit type and status type to automatically populate next to the authorization number. If you did not pick an authorization, select a visit type
- Enter the duration (this will not auto-populate due to agency variations in duration preferences)
- The date will be automatically entered based off the column you clicked on in the calendar
- The start time must be manually entered, but once you click outside the box the end date will be automatically populated based on duration
- Leave Status as Scheduled
- On rare occasions, you may need to schedule a Closed visit retroactively, but in general, choose Scheduled
- Scheduled means confirmed and visible on client, caregiver, AND scheduler calendars
- If needed, assign a caregiver name. The caregiver's name will have already populated if you are working on the regular Caregiver Schedule Board
- If you wish to create a repeating visit, check the box next to Repeated Visit
- Don't forget to select the appropriate days of the week if this is a repeating week pattern
- The authorization select will cause the end date to automatically populate; this will be the standard select
- Click Create Visit
This visit or visit pattern will also be added to the main scheduling board calendar as well as the caregiver's and client's calendars. Long-term patterns will also be registered in the client's personal visit pattern inside their client profile.
Editing Visits
To Edit a single visit from the calendar:
- Click on the visit and select the "Only to this Visit" button.

- Make the necessary change
- Click "Update Visit Details" to apply the changes
To Edit a pattern in calendar based scheduling:
- Click on the visit from the Caregiver Schedule Board
- Click "To All the Visits" blue button

- Next, make the appropriate adjustments
- Click Update Visit Detail
This edit will make the same changes to all visits in the pattern.
Anatomy of a Calendar-Based Visit
Deleting Visits
To delete any visit via calendar-based scheduling, first click the Delete button at the bottom of any Visit Details window.

Once you click the Delete Visit button, you'll get a pop-up with several options:

- Delete only this visit does what it says; if you click it, only this specific visit will be deleted.
- Delete this pattern is referring to the original repeating schedule; if you click it, the entire repeating pattern will be deleted going forward. (Past visits will never be deleted.)
- Delete this pattern and its contiguous visits is referring to the original repeating schedule AND any visit that consistently immediately follows the initial visits; if you click it, the entire repeating pattern AND the following visit will be deleted going forward. (Past visits will never be deleted.)
- Delete all visits for this client is referring to all future visits for a client; if you click it, the entire repeating pattern will be deleted going forward. (Past visits will never be deleted.) This is a great option when you have a client who will no longer receive services from your company.