Scheduling›Transportation Management

Transportation Management

Overview

Ankota supports transportation management with several features, including route view, route management, and drag-and-drop corrections to the route. There is also an option to automatically create a corresponding visit type (such as transportation) if a caregiver reports additional transportation, which can be configured upon request. Mapping functionality is not defaulted in all environments; contact Ankota Support to add transportation to an environment.

Transportation can be billed by:

  • Visit type — Universal Rate
  • Client Billing Table — Unique Billing Rate per Client for Visit Type
  • Bill per Mile

Set-up

Before using transportation, you generally need to:

  1. Set up Zones
  2. Schedule visits
  3. Auto Map (to schedule by location chronologically) prior to clock-in by caregivers

Zones

First, define Zones (zip code "groupings") on the Zone page to easily filter visits based on their area. The Zones page is typically placed under a Mapping section.
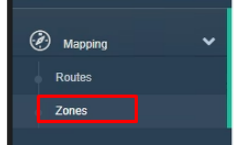
The Mapping dropdown menu is expanded, showing two options: "Routes" and "Zones" (with Zones highlighted in red).

To define a zone, click "Add New Zone" and name the zone. The name can be anything that helps identify the location. Save when done.
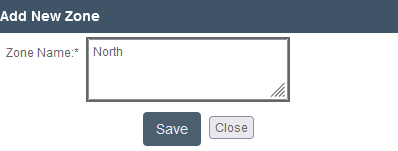
The Add New Zone dialog shows a text input field labeled "Zone Name" containing the text "North" and two buttons below it: a blue "Save" button and a gray "Close" button.

Next, define the zip codes associated with the zone by clicking Zip Codes for that zone, adding the zip code, and clicking the Save Zip Code button. When finished, click the Close button at the bottom.
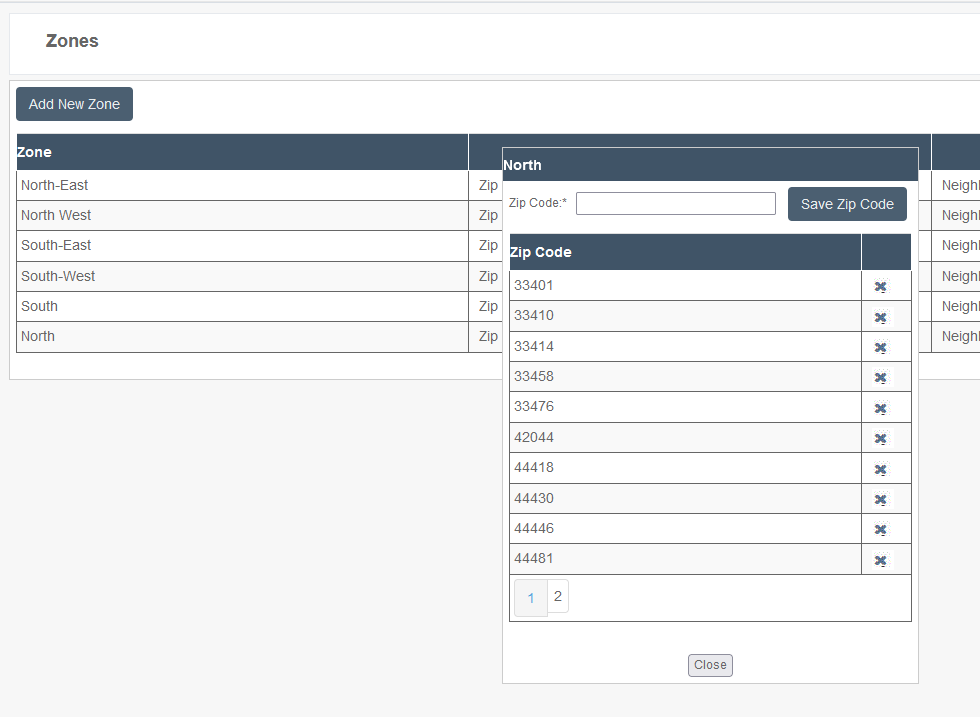
The Zones management page displays a list of geographic zones (North-East, North-West, South-East, South-West, South, and North) on the left, with a modal dialog open on the right showing zip codes associated with the "North" zone. The modal includes a text field to add new zip codes, a "Save Zip Code" button, and a list of existing zip codes (33401, 33410, 33414, 33458, 33476, 42044, 44418, 44430, 44446, 44481) each with a delete option, pagination controls, and a Close button.

The zones are now built. Multiple zones can also be selected when searching for visits.
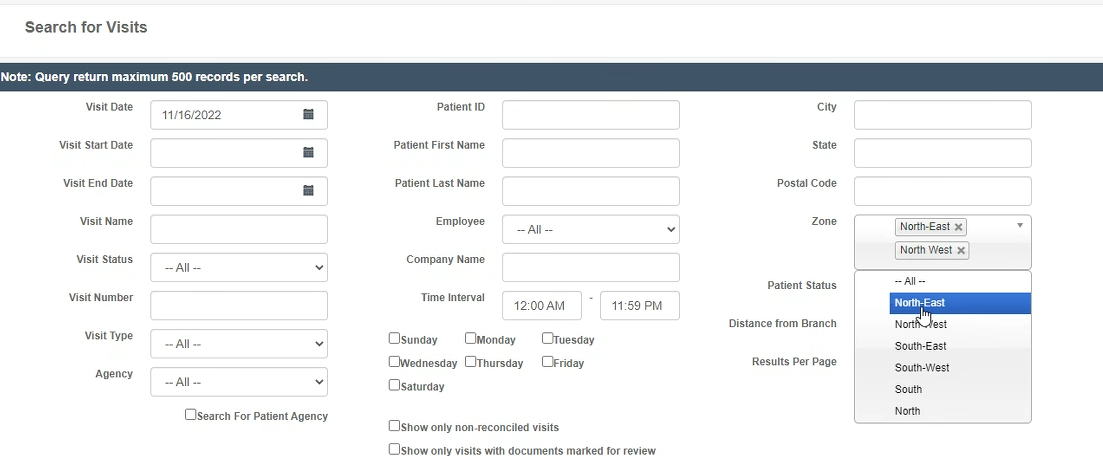
The "Search for Visits" page displays a comprehensive form with multiple filter fields for querying visit records. The left side contains fields for Visit Date, Visit Start/End Date, Visit Name, Visit Status, Visit Number, Visit Type, and Agency, while the center and right sections include Patient ID, Patient Name fields, Employee and Company Name dropdowns, Time Interval settings with day-of-week checkboxes, and location filters including City, State, Postal Code, and Zone with a dropdown menu showing options like North-East, North-West, South-East, South-West, South, and North.

Scheduling Visits

Schedule visits as usual, including assigning a driver. For Transportation visit types (may also be called Pickup, Delivery, or another name), the driver typically clocks in as they park in front of the pick-up location, and clocks out after the client has entered the vehicle when the driver is ready to leave. A typical pickup "visit" is approximately 5 minutes for this reason.

A list view of delivery route assignments showing stop locations, assigned drivers (MDS Driver 2, MDS Driver 5), delivery time windows, scheduled dates (Wed 11/16/2022), route numbers, and status indicators (Pending, Scheduled) with action buttons on the right side for each row.

Auto Map (Driver/Pickup Mapping Management)

Go to the Visits page and filter for a single date and one or more zones. Select the visits and click the Auto Map button. A series of options will appear. Adjust the options as needed, then click the Schedule Visits button.
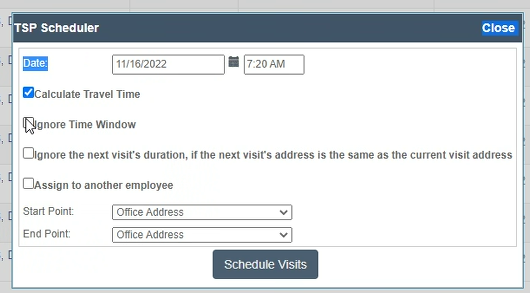
The TSP Scheduler dialog shows scheduling options including a date field set to 11/16/2022 and time field set to 7:20 AM, with checkboxes for "Calculate Travel Time" (checked), "Ignore Time Window", and "Ignore the next visit's duration", plus dropdown menus for Start Point and End Point both set to "Office Address", and a "Schedule Visits" button at the bottom.

A new pop-up will appear showing the mapped series of visits.
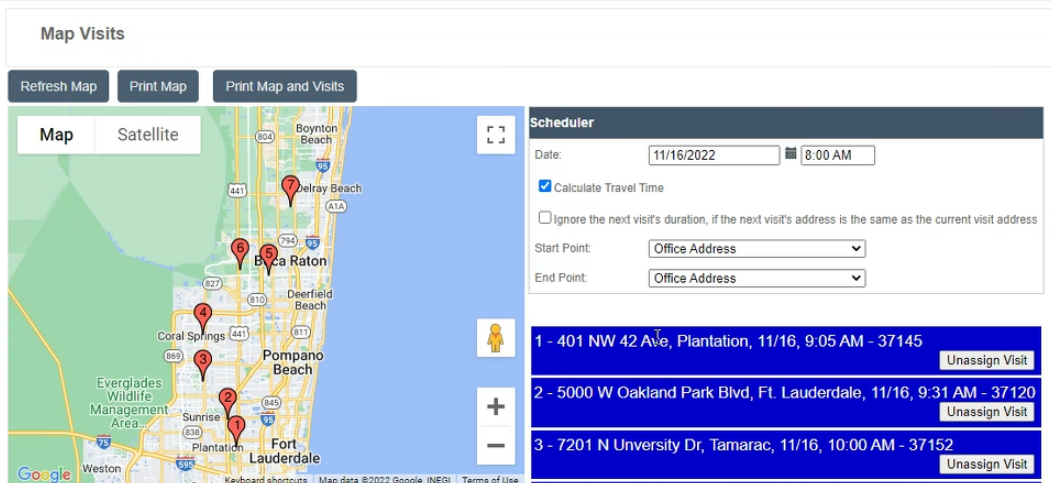
The Map Visits screen displays a map of visit locations in the South Florida area with numbered markers, along with a Scheduler panel on the right showing visit details for 11/16/2022 starting at 8:00 AM. The panel lists three scheduled visits with addresses, times, and "Unassign Visit" buttons, with options to calculate travel time and set start/end points.

Reorganizing the Mapped Series

To reorganize the suggested route, drag and drop the locations on the Schedule Visits - TSP pop-up window to change their order. Alternately, unassign a visit and give it to another driver. This feature is only available via the Schedule Visits - TSP button.
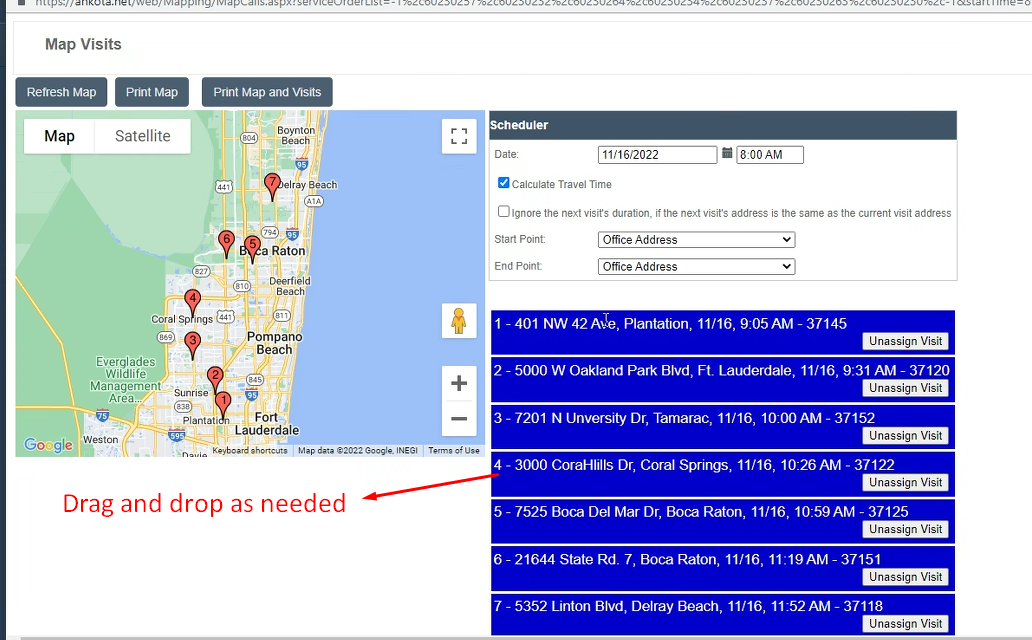
The Map Visits page displays a Google Map with multiple visit location pins and a Scheduler panel on the right showing a list of scheduled visits for 11/16/2022 starting at 8:00 AM, with options to calculate travel time and set start/end points. The visit list includes seven numbered locations with addresses, times, and "Unassign Visit" buttons for each entry.

View Map Button

To view the day's schedule, go to the Visits page, filter for the desired visits, and click Map Visits. The Map Visits button is for view only, purely to view the existing planned pickup schedule. This button is most useful for staff who need to review the visits but do not have permission to reorganize the schedule.

Was this article helpful?
On this page