Arkansas Workflow
Overview
Private pay is generally self-regulating within the confines of state law and regulatory processes. This article focuses on Medicaid billing in the state of Arkansas.
In the state of Arkansas, there are many available programs and different clearinghouses which work with them, in addition to EVV requirements. For Ankota users, that means in addition to regular EVV services, Ankota also creates exportable data that can be used with clearinghouses such as Availity and AuthentiCare.
Currently, the visit types that require EVV (electronic visit verification) in Arkansas are as follows:
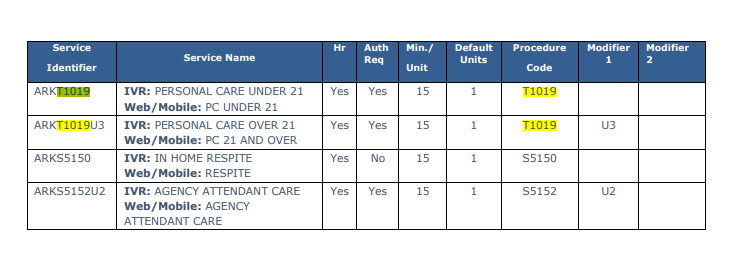
This article covers:
- Set-up
- Testing
- Pre-Billing
- Billing Management for Medicaid non-EVV Visits
- Billing Management for Medicaid EVV Visits
- Remittance Advice Management (835s)
- Corrected Claims
- Further Details
Set-up
Ankota users in Arkansas must be registered with the clearinghouses and payers they intend to work with.
AuthentiCare requires the following elements:
- Provider Medicaid ID
- Client/Consumer ID
- Caregiver/Worker ID (must be Medicaid caregiver ID)
The provider Medicaid ID will be entered during implementation. Service ID (visit type ID), billing information, check-in/check-out time, signature information, modification information, and EVV confirmation data (GPS or IVR) are provided automatically by Ankota in the AuthentiCare export.
Availity requires the following elements:
- Caregiver name, ID, and address
- Client name, ID, primary diagnosis code, and address
Company name, tax ID, taxonomy code, and NPI will be entered by Ankota during implementation. Service ID (visit type ID), billing information, check-in/check-out time, signature information, modification information, and EVV confirmation data (GPS or IVR) are provided automatically by Ankota in the AuthentiCare export.
Testing
Availity does not require advance testing.
AuthentiCare does require testing by Ankota. As soon as the first invoice is complete, notify Ankota to run the test. Once complete, providers will be approved to submit their own files.
Pre-Billing
General Management
Successful billing starts at the beginning of the client's creation. The processes below will lead to successful billing.
Client Management
- Setting Authorized Service for Clients (entering authorizations) — be sure to enter the admission ID
- Schedule Visits — Calendar-Based Scheduling (or the classic Creating Visits from Patterns)
Visit Management
- Caregivers complete visits, or timesheets are entered manually through the office
- Visits are approved automatically or by the office. Specifically, ensure visits are closed, then review and clear the Visit Approval Dashboard
Prevention of Errors/Unmatched/Rejected Claims
- Watch warnings on the Action Center (for missing auths, primary diagnosis codes, IDs, etc.) and address as needed
- Watch warnings on the Visit Approval Dashboard and address as needed
- Ensure that name spellings, First Name/Last Name separation, Medicaid ID, and DOBs are entered correctly
- Manage rejections
The Landing Dashboard will highlight necessary actions, including managing visits as needed.
Billing Management for AuthentiCare / Medicaid
Visit types ARKT1019, ARKT1019U3, ARKS5150, and ARKS5152U2 require EVV and must be submitted to AuthentiCare. To submit these visits to AuthentiCare, follow the process below.
- Schedule visits as usual; caregivers clock in and out as usual
- Manage visits as usual
- Calculate Billing
- Review the Billing Report (Client) and complete invoices
- Export the AuthentiCare report backdated to the start of the period to export
- Only invoiced visits will be included
- Only visits for clients that have AuthentiCare visit types will be included
- REMOVE the header line
- Upload the CSV file to AuthentiCare
- Log in to AuthentiCare Arkansas
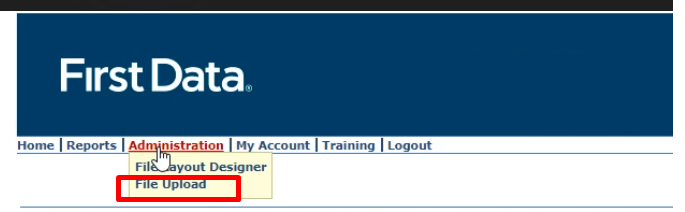
- Click Administration
- Click File Upload
- Select the file layout "ANKOTA CSV UPLOAD"
- Upload the report pulled from Ankota
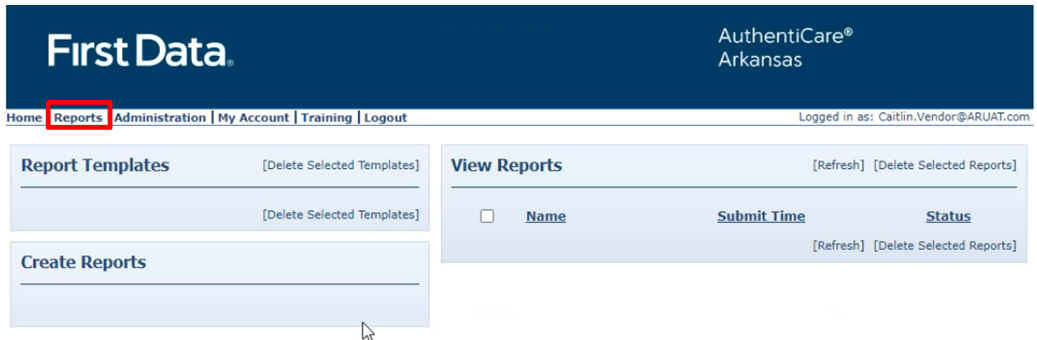
- Check the next day for the report response under Reports
- Manage rejections
The Landing Dashboard will highlight necessary actions, including managing visits as needed.
Billing Management for Availity / Summit PASS Program for Behavioral Health
To prepare the Availity file, complete the normal billing process, then export the Merged Health Care Claim for the appropriate clients and visits. Then upload that file into the Availity portal.
For a more detailed walkthrough, see the Availity guide.
Remittance Advice Management (835s)
Remittance advice files, or 835s, are provided in response to filing Medicaid claims. These files function as state receipts of payments and can be uploaded to Ankota for automatic application of payments in the A/R records. GAMMIS can make this available.
- Process Remittance Advice (upload 835 "receipts" received from MMIS into Ankota)
- Post Manual Payments
- Review Billing Reports (see also: Collections Report, Exceptions Report)
Corrected Claims
Generally, claims corrections are handled as follows:
- Identify the error(s) (usually provided in the response file)
- Correct the error(s) in Ankota
- Re-export the data
- Re-upload the data
Further Details
For more information on training, see the Ankota Training Overview. For short training videos, see the Quick Launch videos.