Missouri EMOMED Billing in Ankota
Overview
EMOMED is the Missouri Medicaid portal which allows for manual entry of billing as well as EDI billing. In order to successfully bill EMOMED using EDI files built by Ankota, complete the following steps:
- Provide the Ankota specialist the EMOMED log-in name and confirm set-up for EMOMED
- Ensure a trading partner agreement is in place and set-up for ERA/835 files with EMOMED
- Complete billing as usual
- Use the Export Merged HealthCare Claims button to create the EDI file for EMOMED
- Complete a test and be moved to production if not previously approved for EDI file upload
- Upload these files to EMOMED
Note that EMOMED still requires Internet Explorer to access the system.
Once files have been uploaded, and assuming the appropriate forms have been filed, remittance advice files (835s) can be retrieved in EMOMED. These 835 files can also be uploaded directly into Ankota for instant updates of billing records.
Set-up
First, make sure a trading partner agreement is on file. If not, one can be filed by going to the EMOMED log-in page, logging in, and using the form on its front page. A trading partner agreement must be on file before proceeding. Login is required to see this form.
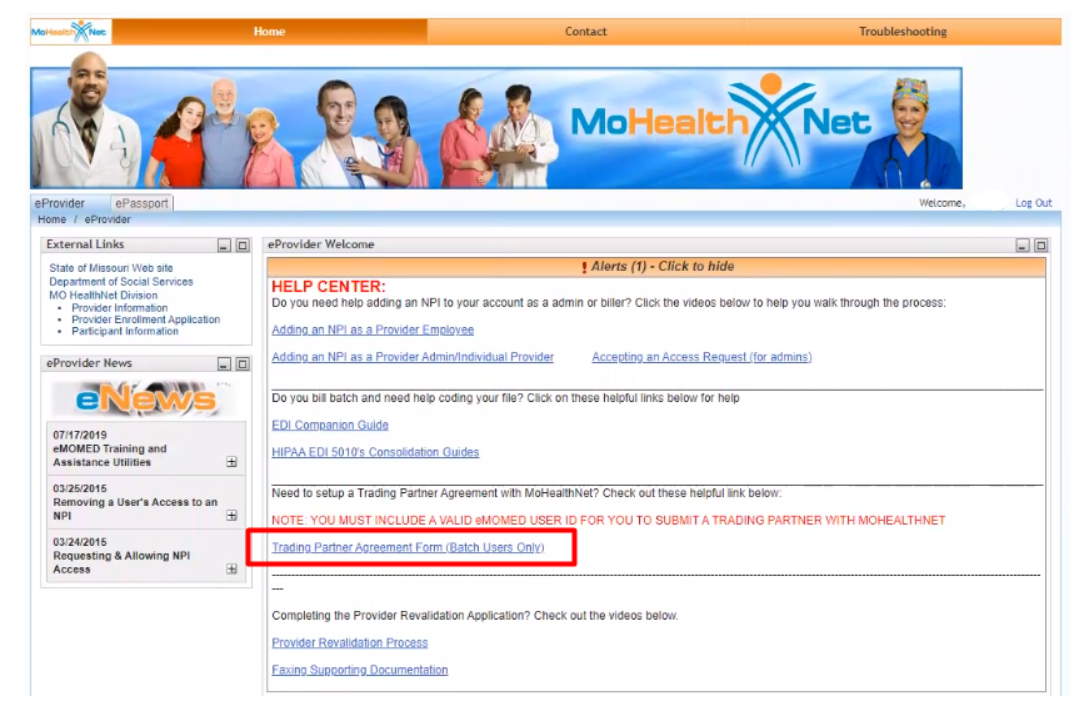
Trading Partner Agreement: TradingPartnerAgreement.pdf (emomed.com)
Next, complete the ERA/835 request form. As of May 2021, the request form can be found on the EMOMED website BEFORE logging in (it is not visible when logged in):
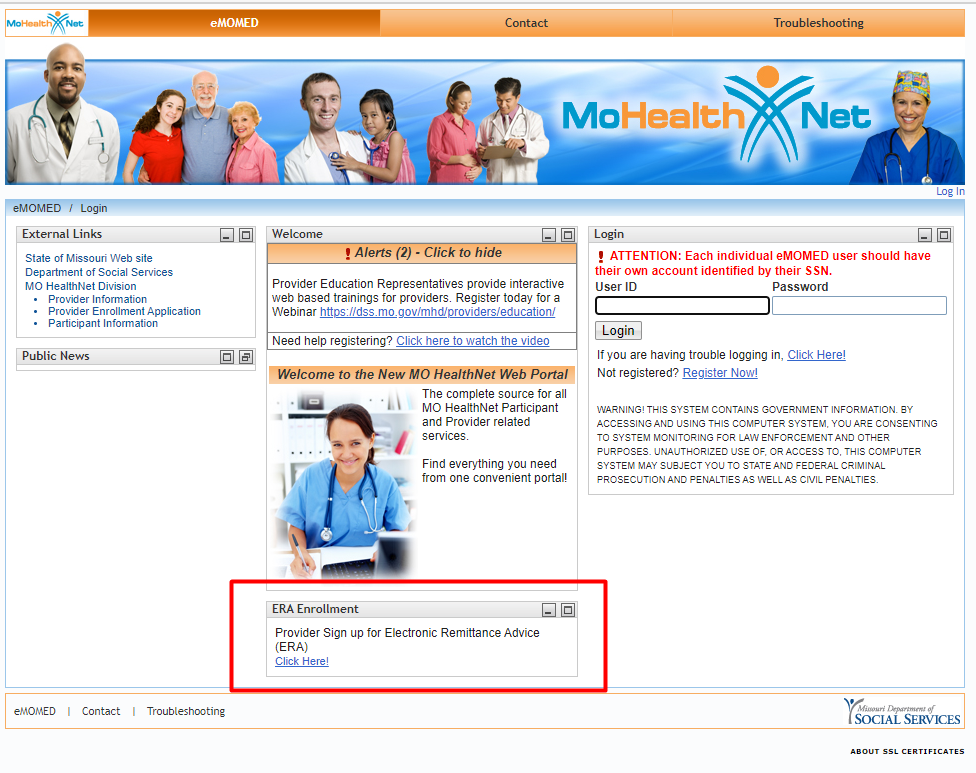
When filling out the trading partner agreement and 835 request form, submit them back to EMOMED. On the 835 form, confirm the method of retrieval is INET EMOMED and that no clearinghouse is used. Other tips:
- Fill out all fields (even if entering "none")
- Use a Chrome browser to fill out the form to avoid issues entering phone numbers (especially with Safari)
Pre-Billing Preparations
During implementation, the implementation specialist will collect NPI numbers, taxonomy codes, address, and other information and will code this into the system. To bill, Ankota users simply perform the usual visit review and billing processes in Ankota. After ensuring client and caregiver data is correctly entered (including primary diagnosis codes), ensuring visits are closed, reviewing the Visit Approval Dashboard, calculating billing, and completing draft invoices, export the Merged Health Care Claim and upload it in the EMOMED portal. Note this will change when billing moves to going through Sandata.
IMPORTANT NOTE: If clients have different Medicaid IDs from the main client ID, request to use the Admission ID field in the authorization to ensure the client's Medicaid ID is sent to the customer.
Testing — Initial Test EDI File in EMOMED
Billing cannot proceed if this section is skipped.
The first step in billing EMOMED is completing a standard test. An approved test must be completed before being moved to Production. Only then can billing proceed.
To complete the test:
- Calculate billing as usual in Ankota
- Export the appropriate claims on the Billing Report (Complete) page by clicking the Export as Merged Health Care Claim button
- Log into EMOMED
- Click on File Management
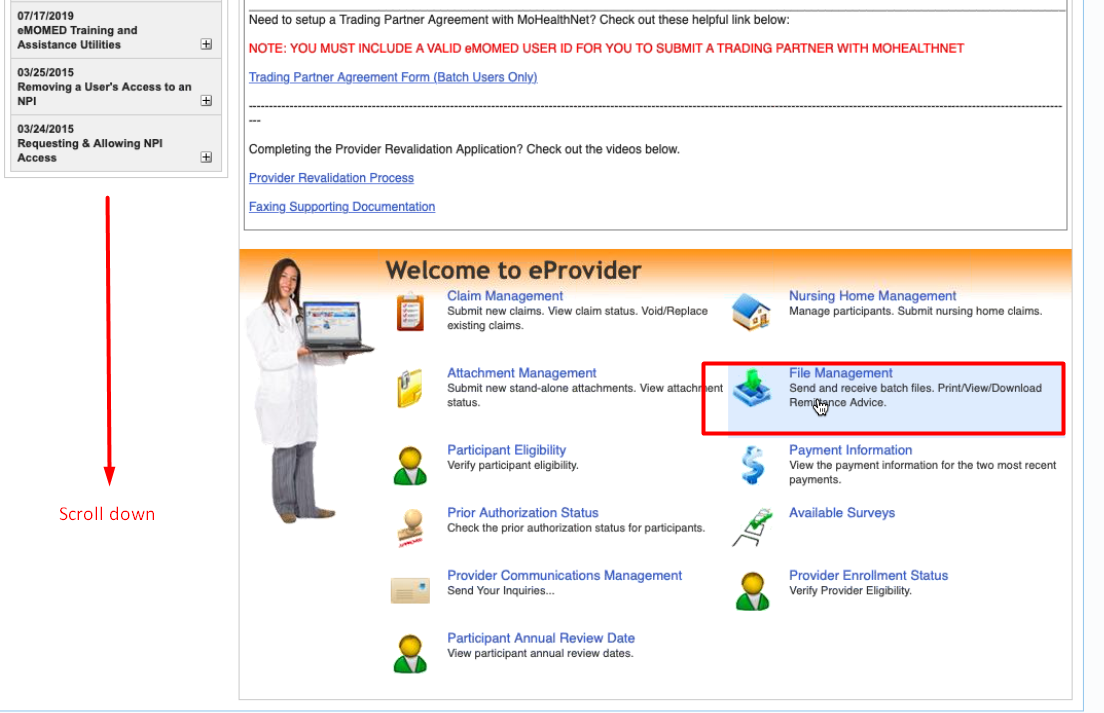
- Click on Manage Test Files
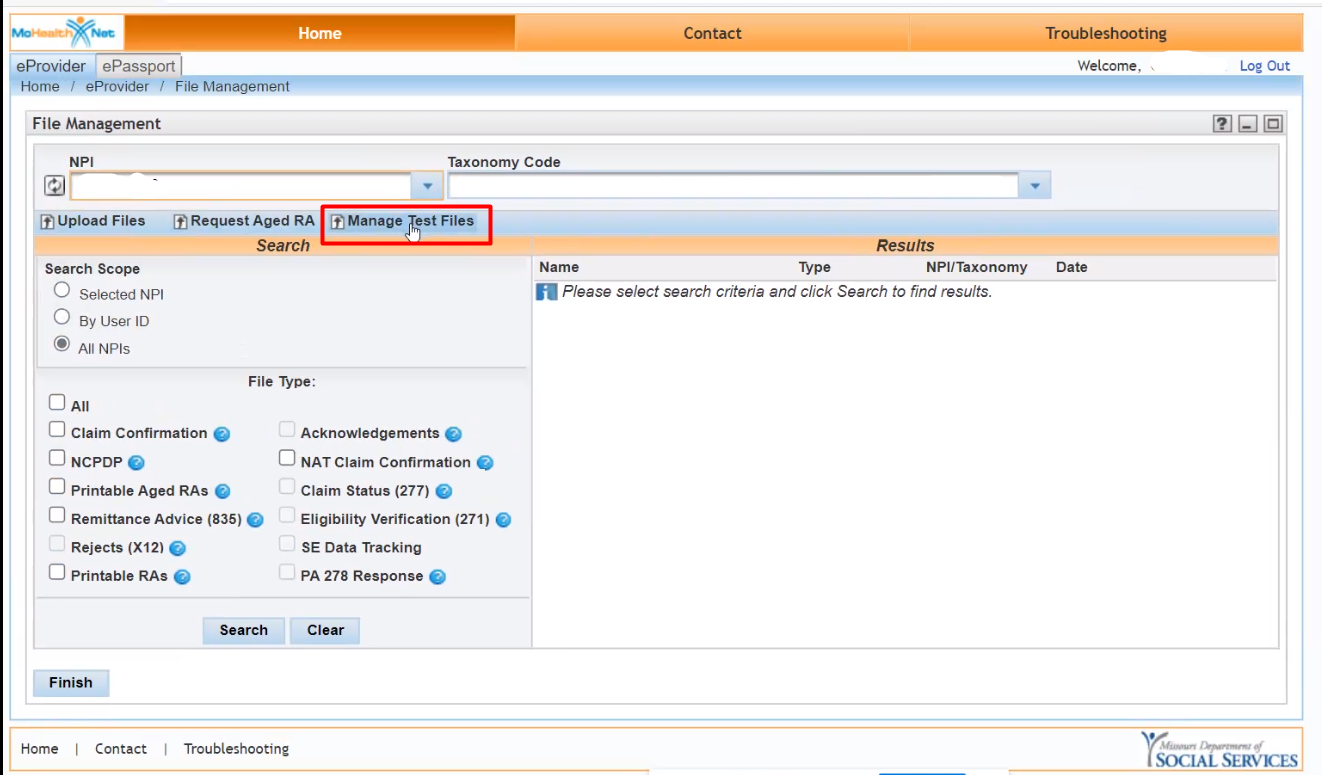
- Upload the Merged Health Care Claim file (click the Select File button, select the file, click the Send Files button)
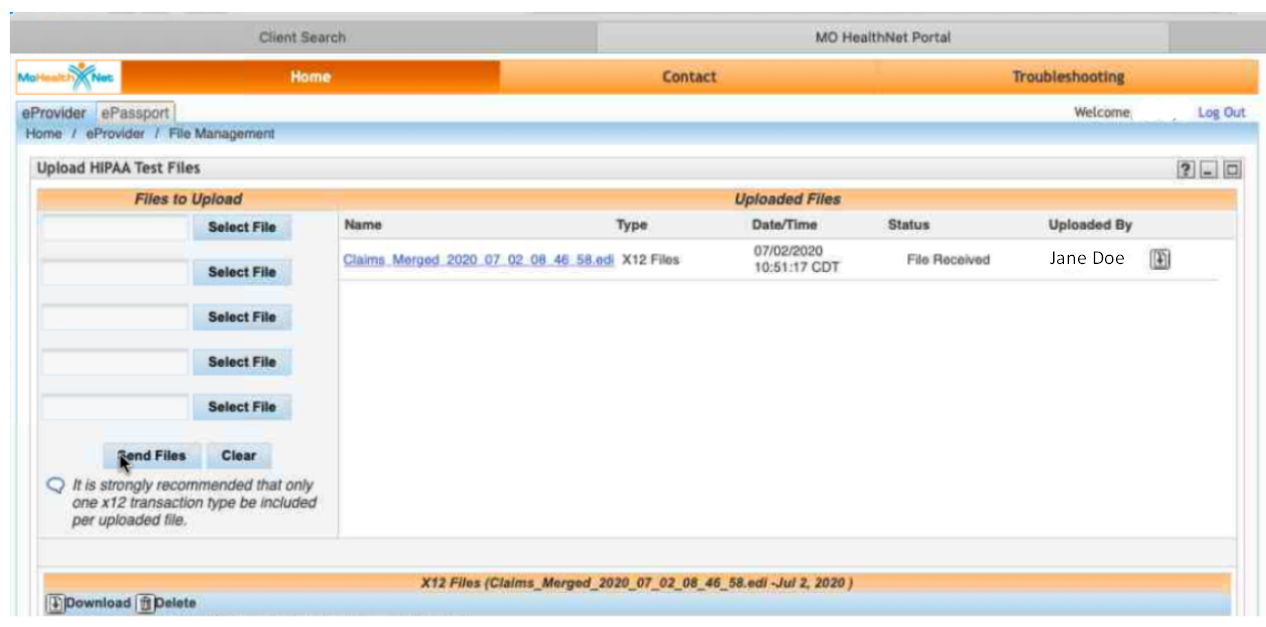
Test File Response
Within 24-48 hours, check for a claim confirmation file. Then email help.desk@momed.com using the following script and ask to be moved to production:
Hi! I'm writing to request a test file review so that I can be moved to Production.
My submitter ID is [YOUR ID] with company [NAME & NPIs]. I submitted a test file on DATE. The transaction type I submitted was an EDI 837P/ 5010X222A1 file (in the HIPAA Test Files folder). Could you confirm this file and move me to Production, please?
Of course, if there's any issue, just let me know.
Thank you so much!
[Your name & company]
Once the confirmation is received, regular billing can begin. Without confirmation of being moved to production, EMOMED will not process data. Do not proceed without completing the test and confirming production status.
Regular EDI File Uploads in EMOMED
Once the test is complete AND production status has been confirmed by EMOMED, upload files for billing as needed using the standard process below.
To upload an EDI file to EMOMED:
- Calculate billing as usual in Ankota
- Export the appropriate claims on the Billing Report page by clicking the Export as Merged Health Care Claim button
- Log into EMOMED
- Click on File Management
- Click Upload Files
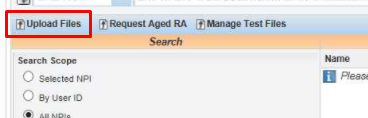
- Upload the Merged Health Care Claim file (click the Select File button, select the file, click the Send Files button)
Within 24-48 hours, check for a claim confirmation file or 835 response file.
Claim Confirmation Files
For clients who prefer to use the manual review process, EMOMED's claim confirmation files are available within 24-48 hours after submitting claims.
To review claim confirmations:
- Log back into EMOMED the next business day to see what was accepted and what was rejected
- In EMOMED, click on claim confirmation, then click search
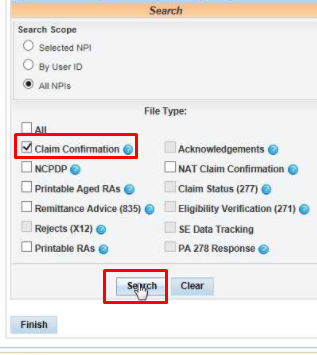
- The claim confirmation file will have the date and whether it is confirmed or rejected
- Log back in the next business day to see what was accepted and what was rejected
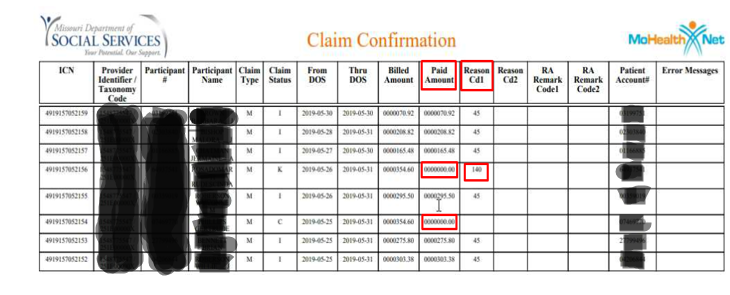
- If a claim wasn't paid (like in the red squares above), look for the reason. Look that reason code up in the list from EMOMED.
- Fix the issue in Ankota (in this example, the DCN was different than what EMOMED had on record).
- Once fixed, resubmit the claim.
If an unpaid claim does not have a code, call the EMOMED help desk (573-635-3559) for more information.
For more information on response codes, see:
- Reason Code 1 explanations: https://x12.org/codes/claim-adjustment-reason-codes
- RA Remark Code 1 explanations: https://x12.org/codes/remittance-advice-remark-codes
- Missouri's FAQ on claims
Remittance Advice Files (835s)
For a faster, digital version of claim confirmations, 835 files (also known as electronic remittance advice files, or ERAs) are provided at the end of the billing cycle in response to EDI files, so long as the appropriate forms have been completed. To see the results of claims and enjoy the benefits of automated billing updates and exceptions reports, upload the 835 on the AR screen in Ankota.
NOTE: The ERA lists all claims submitted during the previous billing cycle. An ERA will not be issued until after the current billing cycle ends, and more specifically three business days prior to receiving the check. The claims processing and payment schedule is available at: http://manuals.momed.com/ClaimsProcessingSchedule.html