Nurse Access and Documents Guide
Overview
Ankota provides nurses with two methods for accessing and completing documents:
-
Ankota Caregiver Next Gen App / ankota.net/employee
The appropriate method depends on your organization's workflow and security requirements.
Nurse User Setup
Before a nurse can access documents, an RN login must be created and configured properly.
Nurse User Role Requirement
If you do not currently have the RN User Role assigned to your account, RN functionality will not be available.
Please contact Ankota Support and request that the RN User Role be added to your environment. Once assigned, you will be able to access Nurse/RN-specific features throughout the system.
Creating the Nurse Caregiver Profile
-
Log in to ankota.net.
-
Navigate to Users > Caregivers.
-
Select Create Caregiver.
If the caregiver profile already exists, you may skip this step.

Configure the Profile
Within the caregiver profile:
-
Set User Role = Caregiver
-
Set Template = CompanyName_RN

- Check Create Mobile/IVR User
Create a username using a consistent naming convention:
Example:
company.m.smith
(Company initials + first initial + last name)
Create a temporary password for the caregiver. They will be prompted to change this password upon first login.
When finished, scroll to the bottom of the page and select Save Personal.

Required Profile Information
To prevent future login and billing issues, ensure the following information is completed:
-
First Name
-
Last Name
-
Date of Birth
-
FCSR ID (if required by your state)
-
Email Address
-
Phone Number
-
Start Date
-
Caregiver Code
-
Caregiver ID (Same as Caregiver Code)
- This field can be customized should your state need additional credentials for tracking, such as a NPI. Please reach out to Support to have this field configured for your state's requirements.
Nurse Login Options
Once the profile has been created, the RN may access Ankota through the following methods:
-
Ankota Caregiver Next Gen App
-
ankota.net/employee (Web Version of the App)
First-Time Login
The RN should log in using the username and temporary password configured on their caregiver profile.
Be sure they know their organization code (Org).
Upon first login:
-
Select the drop down arrow for Change Password
-
Enter the temporary password.
-
Create a new password.
-
Confirm the new password.
-
Select Save.
A green success message will confirm that the password change was completed.
Nurse Access Through Ankota.net
RNs logging in through ankota.net typically have access to:
-
Client Search
-
Visits
-
Scheduling
-
Documents
Additional permissions may vary by organization.
Nurse Access Through the Ankota Caregiver Next Gen App
Ankota Caregiver Next Gen App & ankota.net/employee
The RN will use the same username and password configured in Ankota.
Once logged in, they can access:
-
Scheduled Visits
-
Payroll
-
Payroll is an estimate only.
-
Taxes are not included.
-
Amounts are based on closed visits processed through payroll.
-
-
Calendar
-
Settings
These features allow nurses to manage schedules, review visit information, and complete documentation while in the field.

Please reach out to Support if you are wanting a tab added or removed.
Documents Through the Mobile App
The Ankota Caregiver Next Gen App is the easiest and most commonly used method for nurses to complete documentation.
Requirements
For documents to appear within the mobile app:
-
The document must exist in Ankota.
-
The document must be assigned to the appropriate visit type.
-
The nurse must have a scheduled visit associated with that visit type.
If any of these requirements are missing, documents may not be visible.
Assigning Documents to Visit Types
To make documents visible for a visit type:
-
Open the desired Visit Type.
-
Select the Documents tab.
-
Check the box beside each document that should be available.
-
Save your changes.
Once assigned, nurses scheduled on that visit type will see the appropriate forms in the mobile app.
Requesting New Documents
If a document is not currently available in Ankota:
-
Contact an Ankota Specialist.
-
Provide a copy of the original form.
Typical timelines:
-
Simple agency forms: Usually completed within a few days.
-
State-mandated or fillable PDF forms: May require development work and a longer implementation timeline.
Working with Documents Online and Offline
The mobile app supports offline documentation. To ensure information syncs correctly, follow these best practices.
Before Going Offline
-
Log into the app while connected to the internet.
-
Verify that visits have loaded.
-
Open the visit and confirm documents are visible.
If documents do not appear, exit the visit and re-enter it while still online.
During the Visit
The nurse may:
-
Clock in
-
Clock out
-
Complete visit documentation
-
Fill out required forms
-
Work offline if necessary
A tablet is recommended for documentation but is not required.
Syncing Completed Documentation
At the end of the day:
-
Reconnect to the internet.
-
Allow the app to sync EVV data automatically.
-
Open Documents.
-
Select Process Documents.
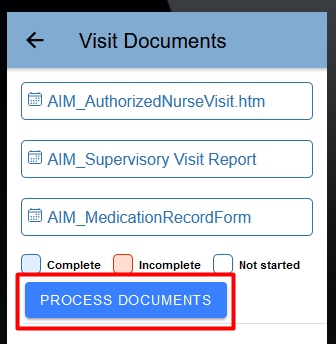
This step sends completed documents back to the agency office.
Documents Through Ankota.net
Some agencies prefer nurses to complete forms directly through ankota.net rather than the mobile app.
Requirements
For this workflow:
-
Documents must exist in Ankota.
-
Document permissions must allow RN/Nurse access.
-
The nurse must be assigned the proper RN/Nurse template within the caregiver profile
-
Appropriate user permissions must be configured.
If documents are missing, contact your Ankota Specialist to verify:
-
Document permissions
-
RN template permissions
-
RN login configuration
Completing Documents in Ankota.net
-
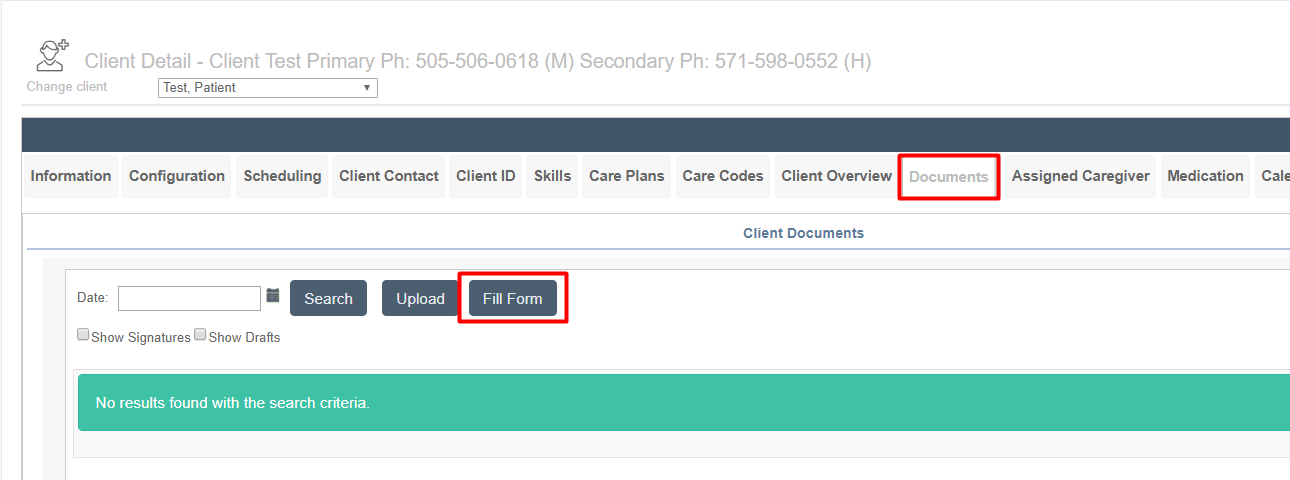
Open the client's profile.
-
Select the Documents tab.
-
Click Fill Form.
-
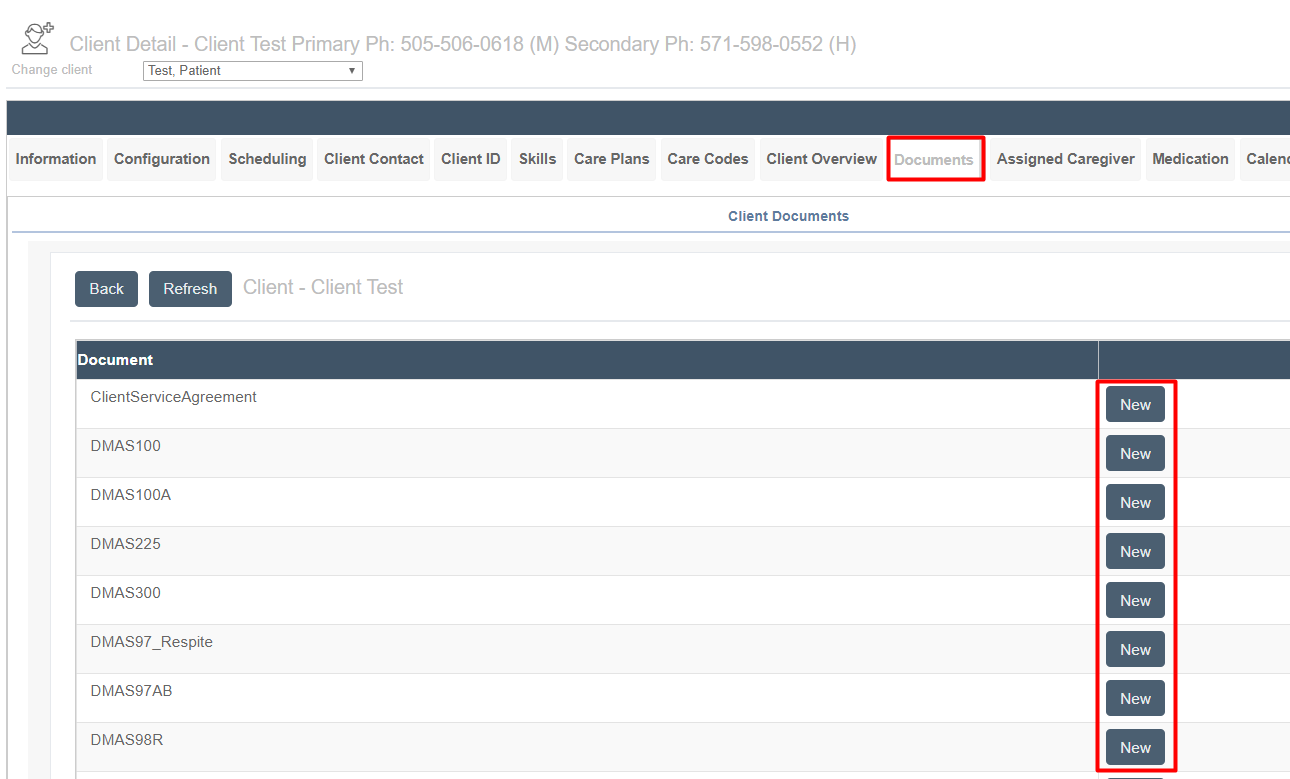
Locate the desired document.
-
Select New.
-
Complete the form.
-
Save before exiting.
Additional Resources
If you have any questions regarding RN setup, document access, permissions, or mobile workflows, please contact Ankota Support.