Reporting›Timesheet Approval Report

Timesheet Approval Report

Overview

The Timesheet Approval Report shows the hours worked for clients in one-week increments. The report can be printed and mailed, or sent via email.

Accessing the Report

From the main menu, click Billing/Payroll → Timesheet Approval.
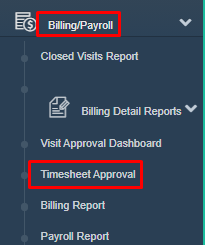
The Billing/Payroll dropdown menu is expanded, showing options including Closed Visits Report, Billing Detail Reports, Visit Approval Dashboard, Timesheet Approval (highlighted in red), Billing Report, and Payroll Report.

  1. Choose a client from the drop-down menu. The report can be run for all clients or a specific client.
  2. Filter the dates to include on the report. This is typically done in one-week increments to see the time worked for that week.
  3. Click Generate Report.

This is a report generation interface showing filter options for a client report, with fields for Client (set to "Test, Client"), Start Date (11/1/2020), and End Date (11/6/2020), along with an "Exclude clients with contact preference Email" checkbox and action buttons for "Generate Report," "Send report via email," and "Track Notifications."

The report will be generated on the screen. Note that the report will automatically include the whole week. For example, a search starting on 11/1 will include 10/31 if that is the start of the week.
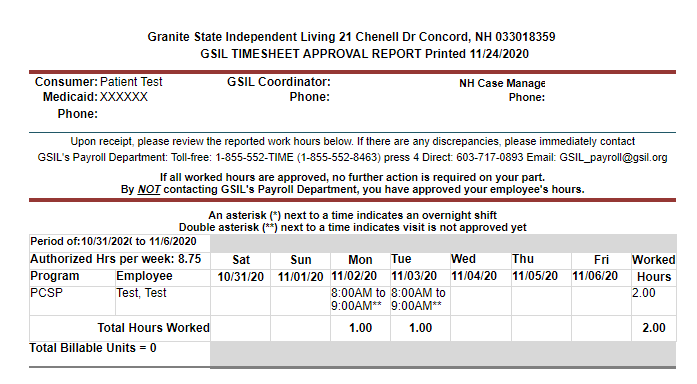
GSIL Timesheet Approval Report for Granite State Independent Living showing a patient's work hours from 10/31/2024 to 11/6/2020, with authorized hours per week of 8.75 and daily time entries including an 8:00AM-9:00AM shift on Monday and Tuesday marked with asterisks indicating overtime, totaling 2.00 hours worked.

Emailing the Report

To email the report, repeat the steps above but click Send Report via Email. An email will only be sent if the client has an email address on file.

This screenshot shows a report generation interface with filter fields for Client (set to "Test, Client"), Start Date (11/1/2020), and End Date (11/6/2020), along with action buttons including "Generate Report," "Send report via email," and "Track Notifications," and a checkbox option to exclude clients with email contact preference.

Printing the Report for Mailing

To identify clients without an email address (who will need the report mailed), check the box for Exclude clients with contact preference email, then click Generate Report.

To print the reports, click Print. Choose either Print with Preview to preview before printing, or Print without Preview to start printing immediately.
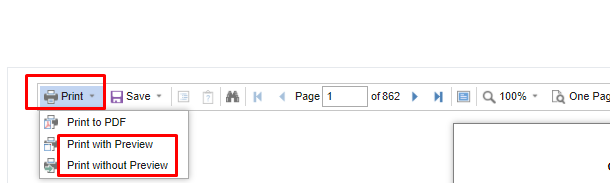
The Print dropdown menu is open, displaying three options: "Print to PDF," "Print with Preview," and "Print without Preview." The menu appears in a document viewer toolbar that shows page 1 of 862 and 100% zoom level.

Once printed, the reports can be mailed as usual.

Adding an Email Address to a Client Record

To add an email address to a client's record so the report can be emailed:

  1. Go to the client file.
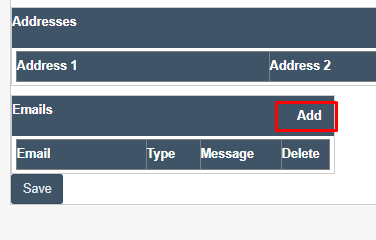
  2. Click Add on the email line.

The Addresses and Emails section of a contact form, displaying two address fields (Address 1 and Address 2), an Emails table with columns for Email, Type, and Message, an Add button to create new email entries, and a Delete option for removing entries, with a Save button at the bottom.

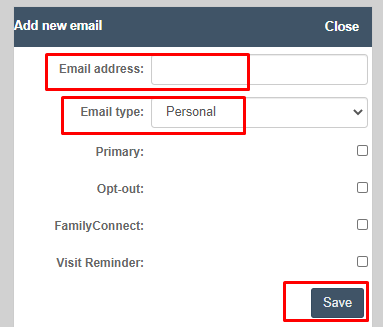
  1. In the pop-up box, enter the email address.
  2. Click Save.

The "Add new email" dialog box displays fields for entering an email address and selecting an email type (set to "Personal"), along with checkboxes for Primary, Opt-out, FamilyConnect, and Visit Reminder options, and a Save button to confirm the new email entry.

  1. Click Save on the main face page. The client will now be set up to receive the report via email.
Was this article helpful?
On this page