Billing›Posting Manual Payments (Accounts Receivable)

Posting Manual Payments (Accounts Receivable)

Overview

To post manual payments, typically for private pay clients, access the client's unpaid invoices through the AR screen or via the client's Accounts Receivable page.

NOTE: For 835 electronic remittance advice uploads (for automatic application of payments), see the related ERA article.

This article includes:

  • Posting a Payment - full invoice (Pay in Full Selected Invoices)
  • Accessing Accounts Receivable Directly
  • Accessing the AR Screen
  • Posting a Payment - partial payments (Accounts Receivable)
  • Invoice-Specific Partial Payments
  • Write-offs

Posting a Payment - Full Invoice

Much of the time, you simply want to mark an invoice as paid for private pay clients. To do so:

  1. Calculate Billing.
  2. Complete the draft billing (if it is not already completed).
  3. Check the box next to the invoice.
  4. Click the Pay in Full Selected Invoices button.
  5. The visit will be marked as Paid, reflected in A/R.
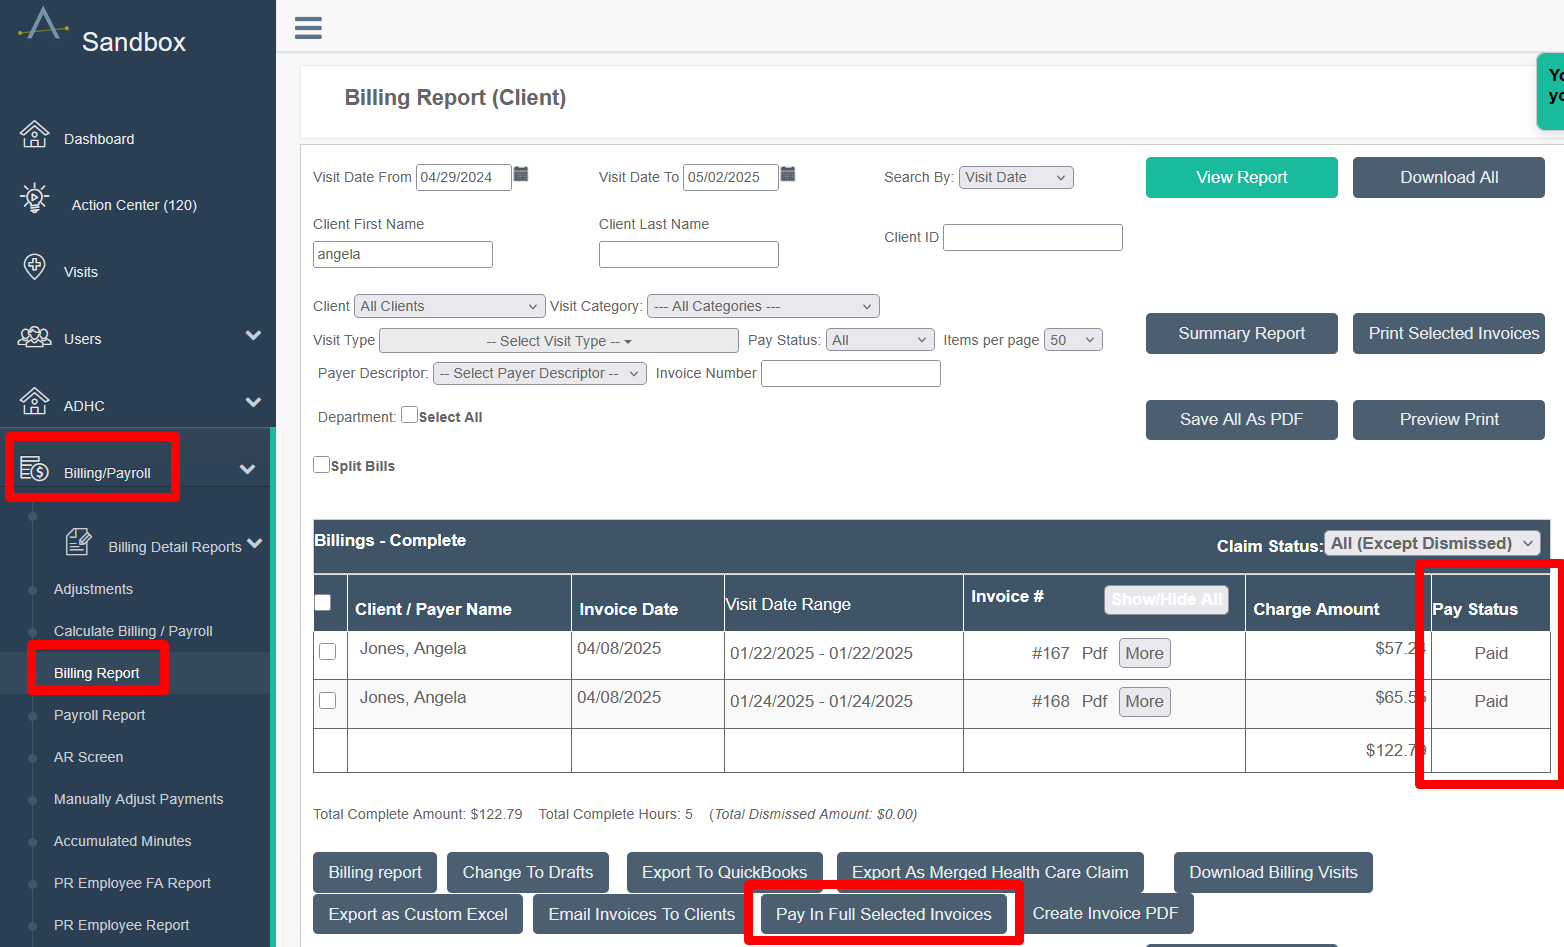
The Billing Report (Client) page displays a searchable billing interface with filter options for visit dates, client names, and invoice details, along with a results table showing client billing records with invoice dates, visit date ranges, invoice numbers, charge amounts, and pay status.

Accessing Accounts Receivable Directly

The Accounts Receivable page is where manual payments can be made and individual client accounts reviewed. Some customers access it directly, while others access it through the AR screen. The Accounts Receivable page looks like this:
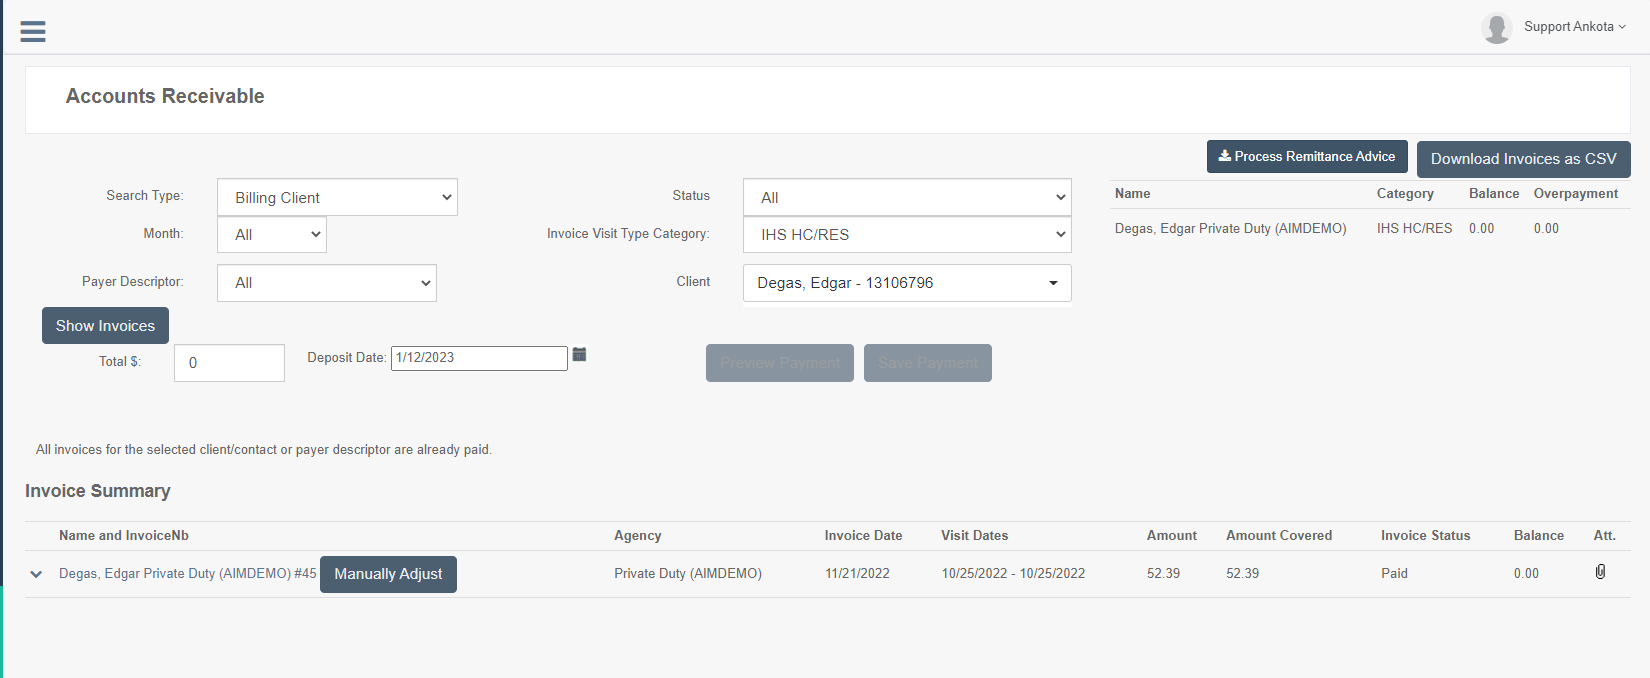
The Accounts Receivable page displays filtered invoices for a selected billing client with search and filter options including Search Type, Month, Payer Descriptor, Status, and Invoice Visit Type Category. The Invoice Summary table below shows invoice details including Name, Agency, Invoice Date, Visit Dates, Amount, Amount Covered, Invoice Status, and Balance, with one invoice listed as "Paid" with a $0.00 balance.

Some customers have a direct Accounts Receivable link in their menu to access the client's individual invoices.
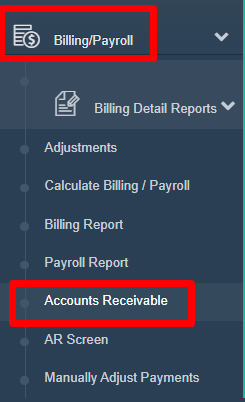
The screenshot shows a navigation menu with the "Billing/Payroll" section expanded at the top in a red highlight box, displaying submenu options including Billing Detail Reports, Adjustments, Calculate Billing/Payroll, Billing Report, and Payroll Report. Below that is the "Accounts Receivable" section, also highlighted in a red box, with submenu items AR Screen and Manually Adjust Payments visible.

Others prefer to have Accounts Receivable accessible via the client's profile.
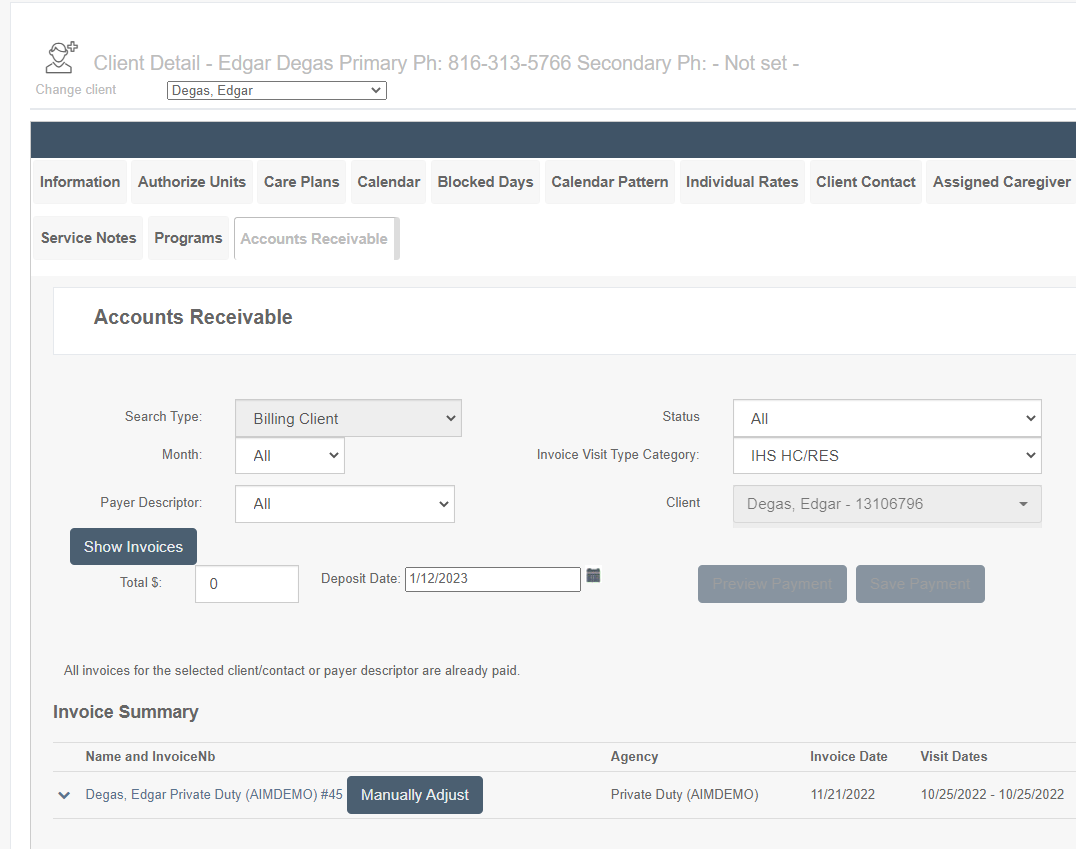
The Client Detail page for Edgar Degas displays the Accounts Receivable tab with search filters for Billing Client, Month, Payer Descriptor, Status, and Invoice Visit Type Category. The page shows an Invoice Summary table listing invoices with columns for Name and Invoice Number, Agency, Invoice Date, and Visit Dates, with one entry for "Degas, Edgar Private Duty (AIMDEMO) #45" marked as "Manually Adjust" dated 11/21/2022.

Most choose to access Accounts Receivable via the AR screen, outlined below.

Accessing the AR Screen

To access the AR screen, click Billing/Payroll, then click the AR screen. (Some environments may also have an Accounts Receivable tab in the client's record.)
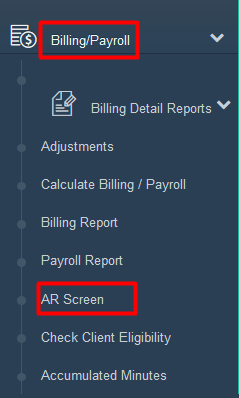
The Billing/Payroll menu is expanded in the left navigation panel, showing options including Billing Detail Reports, Adjustments, Calculate Billing/Payroll, Billing Report, Payroll Report, AR Screen (highlighted in red), Check Client Eligibility, and Accumulated Minutes.

This will open the AR screen, which contains a complete rundown of paid and unpaid invoices by visit category. (For more on exporting reports, see the AR Reports article.) Please note the AR screen refreshes every 15 minutes, so manually applied payments will not be visible until the next round of processing.
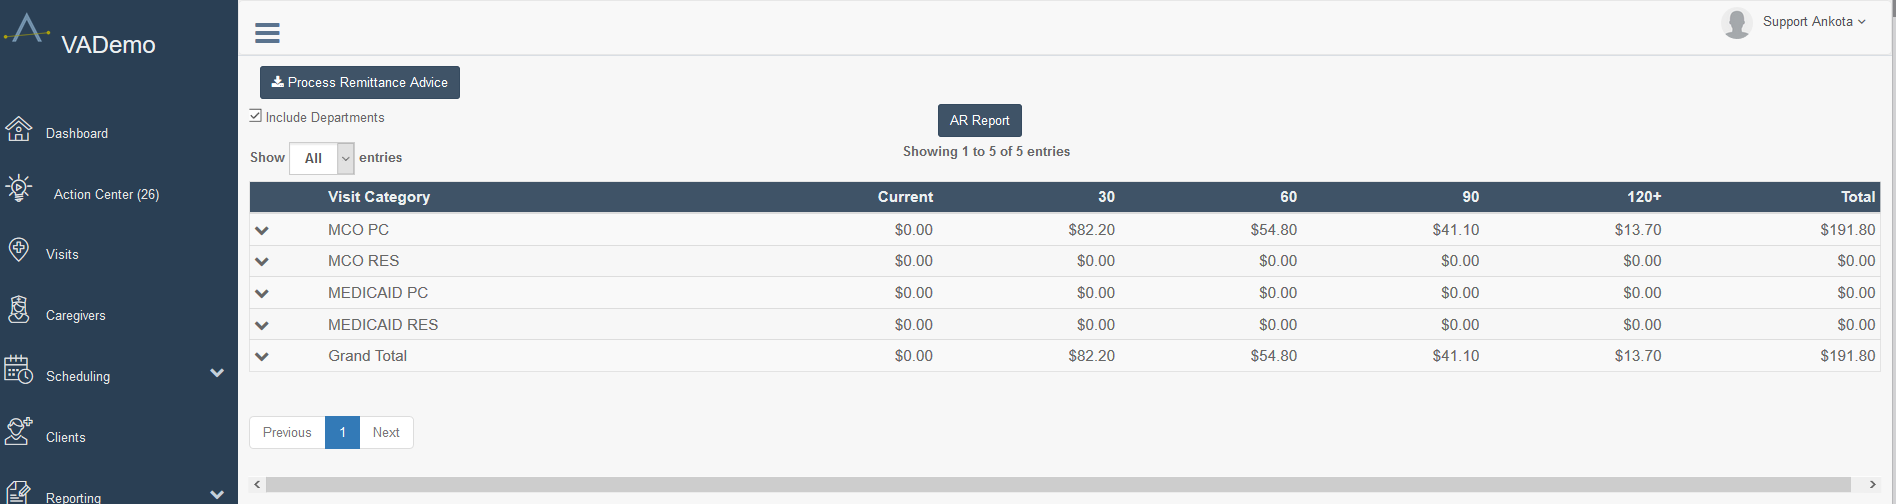
The AR Report screen displays an Accounts Receivable analysis with a table showing visit categories (MCO PC, MCO RES, MEDICAID PC, MEDICAID RES) and their corresponding amounts across aging buckets (Current, 30, 60, 90, 120+) with totals, currently showing 1 to 5 of 5 entries with a Grand Total row at the bottom displaying $191.80 total.

Posting a Payment

To post a payment, go to the more detailed level of the client's Accounts Receivable page.

  1. Click the arrow next to the appropriate visit category. This will expand the category to a client level.
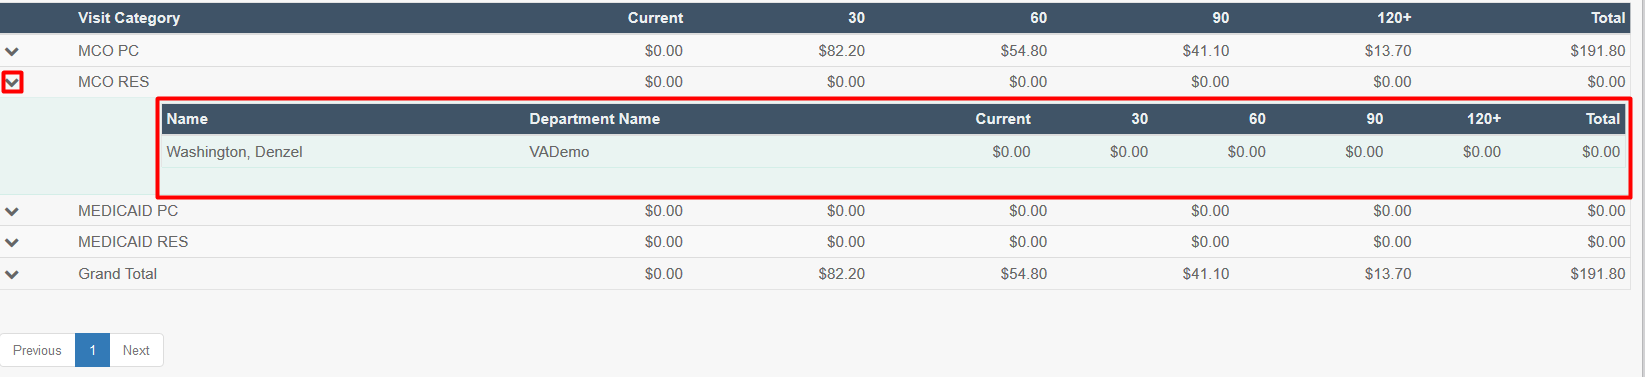
A financial summary table showing Visit Categories with aging columns (Current, 30, 60, 90, 120+, Total), with an expanded MCO RES category displaying a detailed row for an employee named Washington, Denzel from the VADemo department, all showing $0.00 values.

  1. Click on the name of the client to open their page. At the top right is the total balance. The first invoices visible will be the unpaid ones. Below unpaid invoices will be a complete invoice summary, including the unpaid invoices.
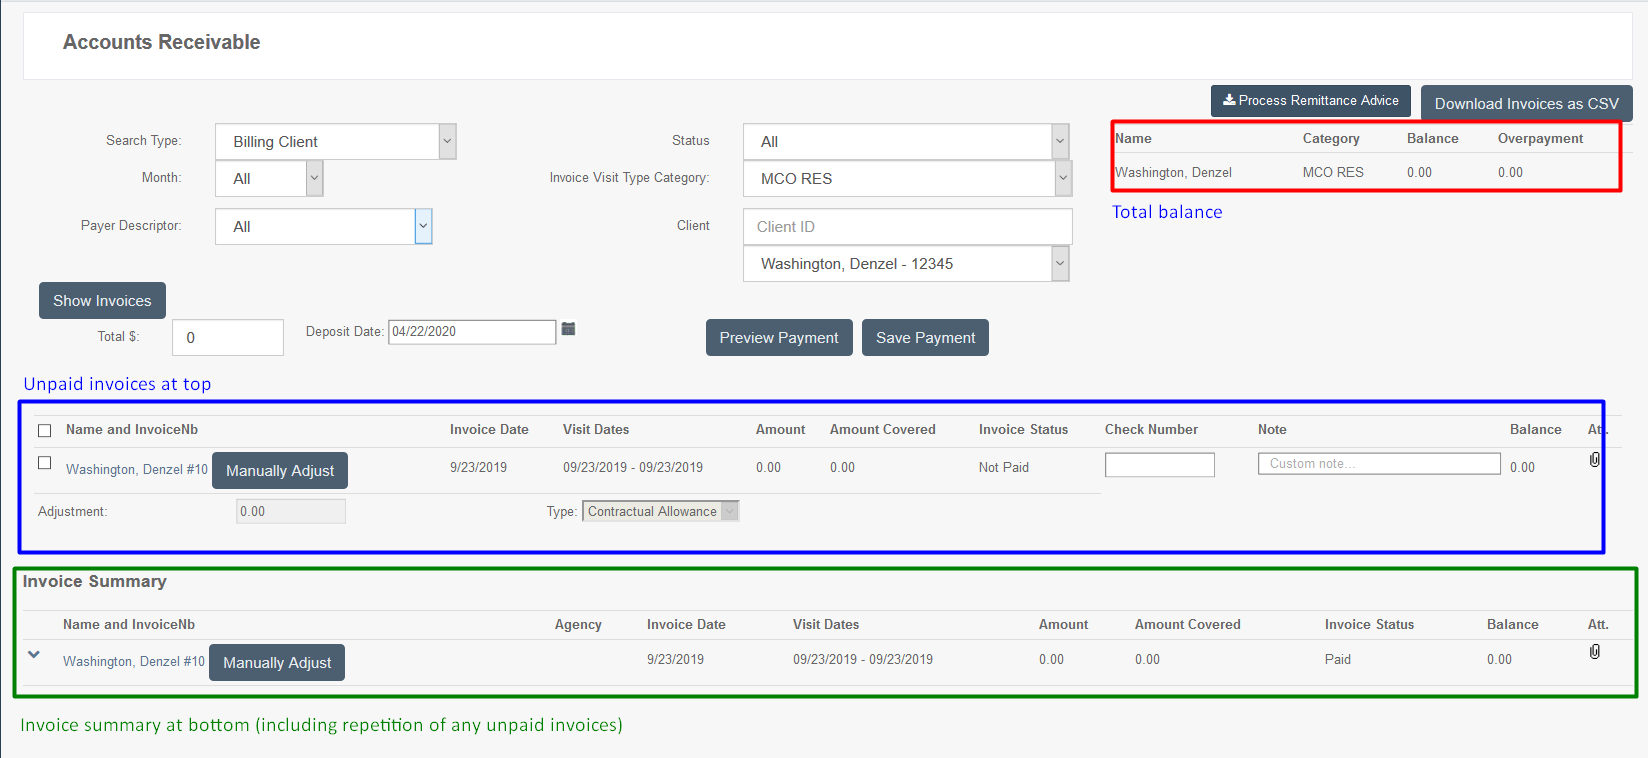
The Accounts Receivable page displays billing client information with search filters for Billing Client, Month, Payer Descriptor, Status, and Invoice Visit Type Category. A results table shows an unpaid invoice for Washington, Denzel with a $0.00 balance and "Manually Adjust" status, along with an Invoice Summary section below displaying the same invoice details with visit dates from 09/23/2019.

  1. To post a manual payment, under the Show Invoices button there is a window with 0 in it. Type the total payment in this window.

The "Show Invoices" section displays a Total field with a value of 0 (highlighted in red) and a Deposit Date field set to 04/22/2020.

  1. Below the payment, check the boxes next to the invoice(s) you wish to apply a payment to, then click Preview Payment. If it looks correct, click Save Payment.

Payment entry screen showing a Total $ field set to 100, Deposit Date of 04/22/2020, and action buttons for "Preview Payment" and "Save Payment" (highlighted in red). Below is a table displaying invoice details for Washington, Denzel #10 with columns for Name and Invoice Number, Invoice Date, Visit Dates, Amount, Amount Covered, Invoice Status, Check Number, Note, and Balance.

The status will update to Paid, and the total in the top right will be corrected.

Please note the AR screen refreshes every 15 minutes, so manually applied payments will not be visible until the next round of processing.

Invoice-Specific Partial Payments

To apply payments on a more detailed level (more specifically for Medicaid clients), click the Manually Adjust button next to the specific invoice you wish to apply a payment to.

Inside the invoice, multiple lines of service will be visible. To apply the payment to just one line of service, enter the payment under the Edit Latest Payment column, then click Apply Payment.
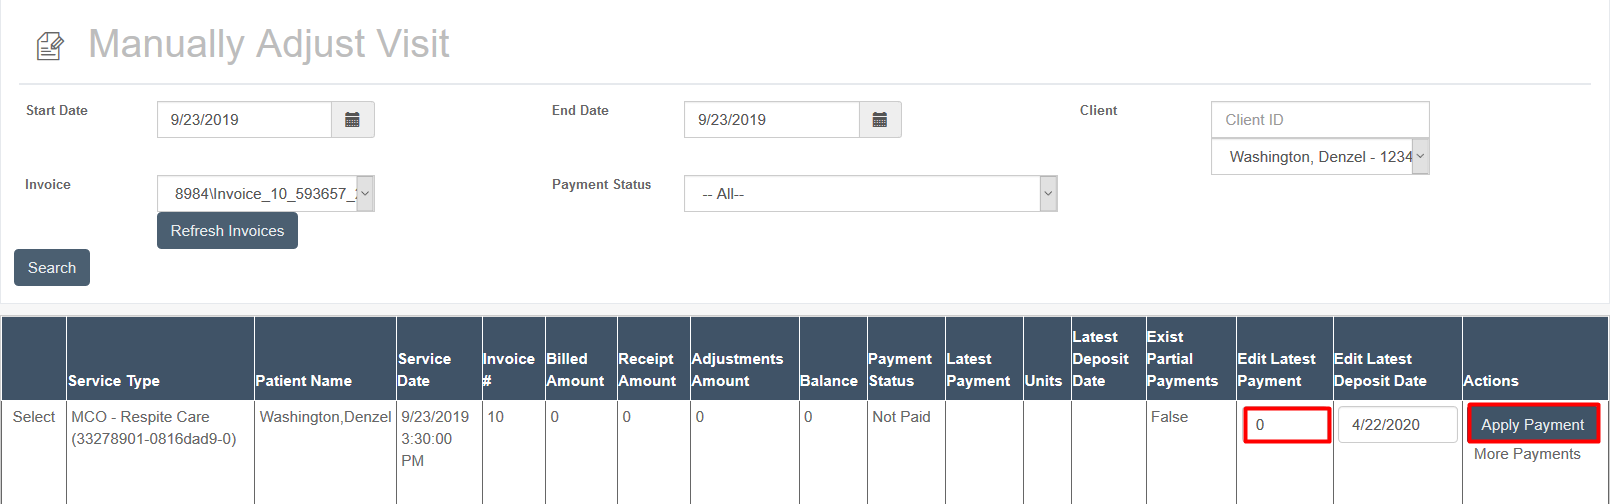
The Manually Adjust Visit page displays a form with search fields for Start Date (9/23/2019), End Date (9/23/2019), Client (Washington, Denzel - 1234), Invoice (8984\Invoice_10_593657), and Payment Status (--All--), along with a Search button and Refresh Invoices button. Below is a results table showing visit details including Service Type, Patient Name, Service Date, Invoice #, Billed Amount, Receipt Amount, Adjustments Amount, Payment Balance, Payment Status, Latest Payment, Latest Deposit Units, Latest Deposit Date, Exist Partial Payments, Edit Latest Payment, Edit Latest Deposit Date, and Actions columns, with one row of data visible for an MCO - Respite Care service.

Please note the AR screen refreshes every 15 minutes, so manually applied payments will not be visible until the next round of processing.

Write-offs

Invoice Level

To add a write-off on the invoice level:

  1. Open the AR screen.
  2. Open a category.
  3. Click on a client's name.
  4. Check the box next to an unpaid invoice.
  5. Beneath each invoice is an adjustment field; fill it out:
    • Enter an adjustment $ amount.
    • Select type.
    • Add Notes if desired.
  6. Click Save Payment (at top).

Visit Level

To add a write-off on the visit level:

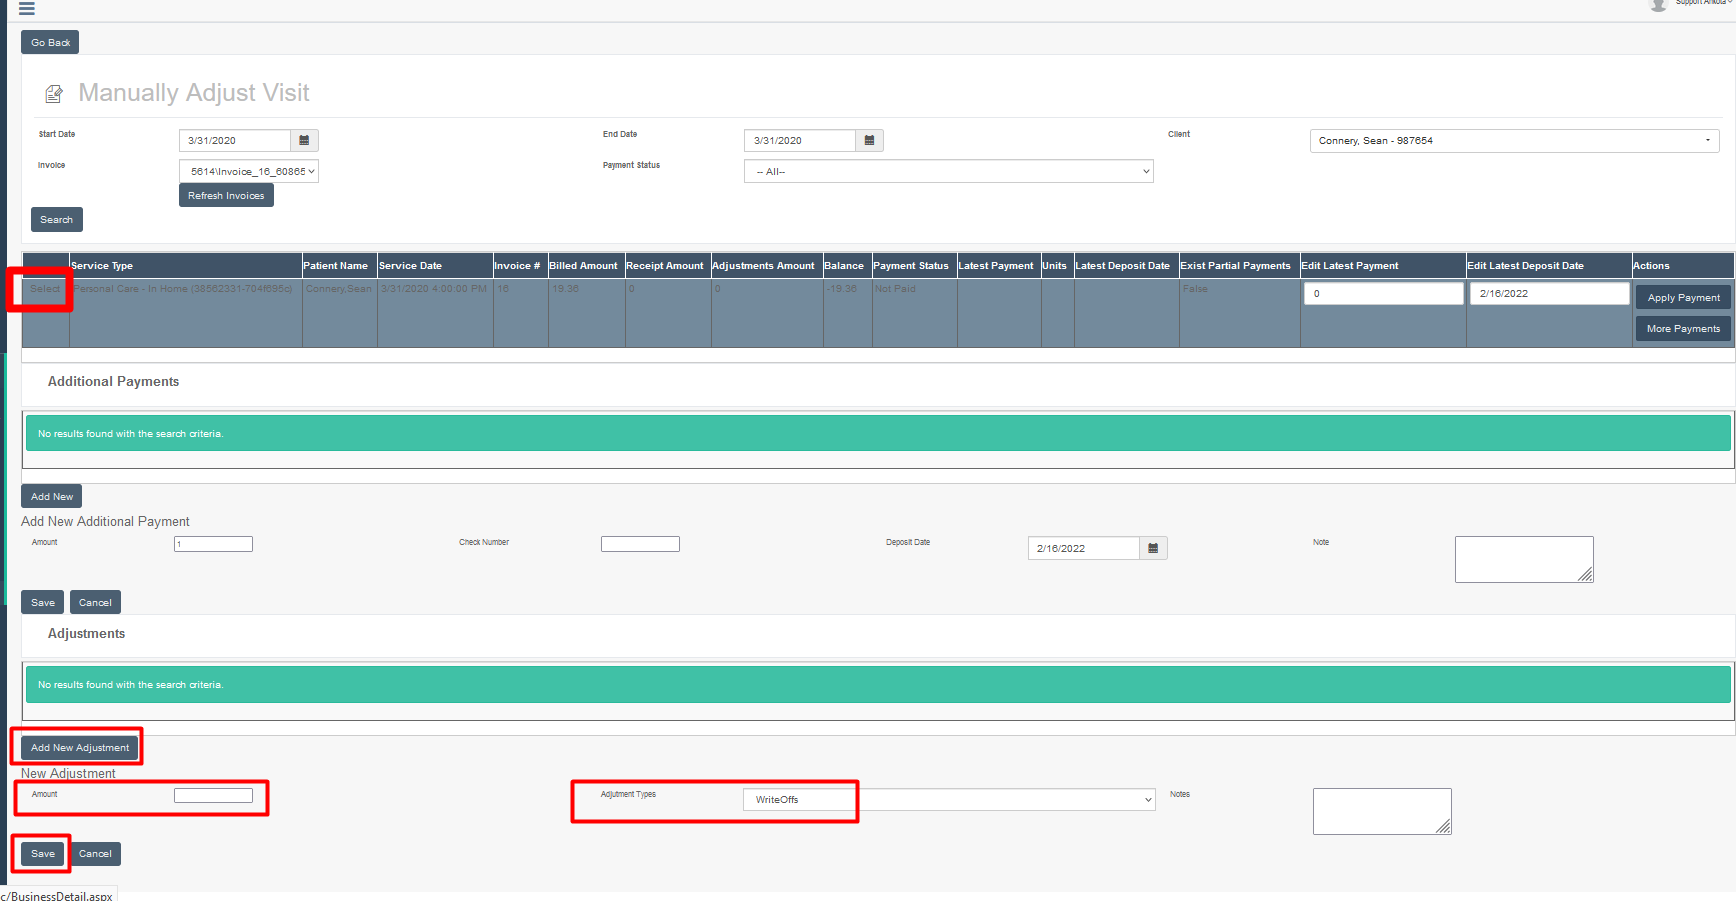
  1. Open the invoice via the AR screen or Manually Adjust Payments screen.
  2. Click Select next to the invoice. This will open adjustments.
  3. Click Add New Adjustment.
  4. Enter the amount.
  5. Set the adjustment type to Writeoff.
  6. Add Notes if desired.
  7. Click Save.

The Manually Adjust Visit page shows a visit record for client Connery, Sean with search filters for Start Date (3/31/2020), End Date (3/31/2020), Invoice (5614), and Payment Status dropdown. A data table displays visit details including Service Type, Patient Name, Service Date, Invoice #, Billed Amount, Receipt Amount, and other payment-related columns, with action buttons like "Apply Payment" and "More Payments" on the right. Below the main table are sections for Additional Payments and Adjustments, each with input fields and "Add New" options, currently showing no results found.

Was this article helpful?
On this page