Setting Bill Codes and Bill Rates
Overview
While Ankota will usually set initial bill rates for clients, organizations add or update their own billing rates over time. Bill codes (the actual dollar amounts) are first set up in Organization Settings. These bill codes, or rates, are then applied to visit types OR to a billing table, depending on the billing structure. Billing tables are then applied to payer descriptors OR to a client.
NOTE: It is important to know whether billing is configured by Visit Type, by Billing Table (applied to Payer Descriptors OR to clients), or by a combination of the two. Customers who bill by visit type have a different process for updating bill rates than customers who bill by payer or by client. If unsure, contact Support for guidance.
This article includes the following sections:
- Setting Bill Codes (Create the rates)
- Applying Bill Codes to Visit Types (Apply the rates)
- Applying Bill Codes to Billing Tables (Apply the rates)
- Applying Billing Tables to Payer Descriptors (Typically Medicaid / MCOs)
- Applying Bill Rates to Individual Clients (via billing tables) (Typically PRIVATE PAY)
- Changing Bill Rates - Guides (OVERVIEW)
Setting Bill Codes
To set a new bill rate (called a Bill Code in Ankota), go to the Main Menu, click Settings, and then click Organization Detail.

Click the Billing Configuration and Bill Codes tabs.

Check whether the billing rate needed is already set. If not, click Add New Bill Code.

Set the Bill Code's name. This is the name of the billing rate, not of the client to be billed. Ankota recommends adhering to the best practice of naming Bill Codes to match the following formula:
- Bill Codes that are Visit-Based = Bill + PV + Rate. For example, a bill code for a visit paid at $50 per visit would be listed as BillPV50.
- Bill Codes that are Length-Based/Per Unit = Bill + PU + Unit Rate. A bill code for a visit paid at $25 per 15 minutes would be listed as BillPU25.
- Bill Codes that are Length-Based/Per Hour = Bill + PH + Hourly Rate. A bill code for a visit paid at $25 per 60 minutes would be listed BillPH25.
Filling in the rest of the Bill Code data requires details about the bill code being prepared. In general, the following are needed:
- What to name the Bill Code
- Whether billing is by duration or visit
- Billing unit (1 hour, 15 minutes, etc.)
- The dollar rate per unit or visit
Then fill in the information as in the example below.

After a billing rate has been set, attach it to a visit type. To do this, go to Settings and Visit Type.

Applying Bill Codes to Visit Types
Select the visit type to attach the new bill code to. Under Bill Code, set the appropriate Bill Code and Save.

Applying Bill Codes to Billing Tables
Unlike visit type-structured billing, billing tables allow for different bill rates for different payers on a by-date basis. This is more commonly used in states where numerous MCOs and insurance options are likely to be used.
To adjust the rates on billing tables, first create the new bill codes needed.
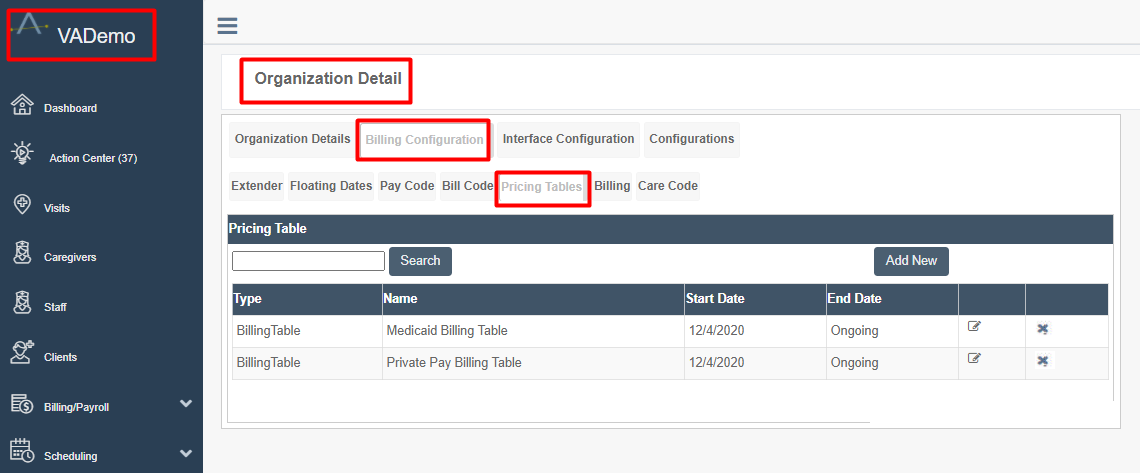
Next, go to Organization Settings, Billing Configuration tab, Pricing Tables subtab. Click the pencil and paper edit icon next to the billing table to update.
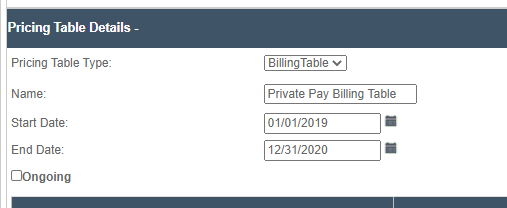
To end the date range of this billing table, uncheck the "ongoing" box and enter an end date.
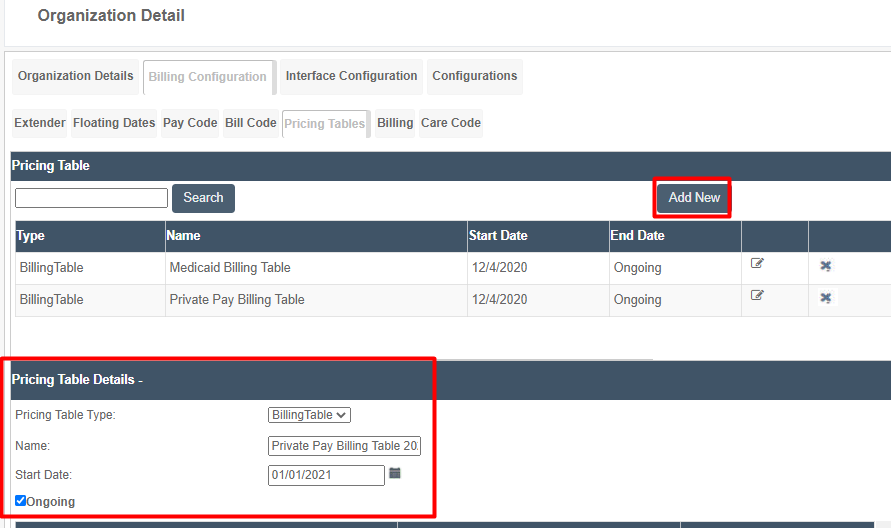
Then click the Add New button. Add a new billing table and name it as desired.
Once created, open it using the edit icon and adjust the new rates using the drop-down list next to each appropriate visit type. Only the visit types in this category need to be updated.

Applying Billing Tables to Payer Descriptors
Please note: if billing tables are applied to CLIENTS, skip this step.
Once all rates are updated, apply these billing tables to the categories they apply to.
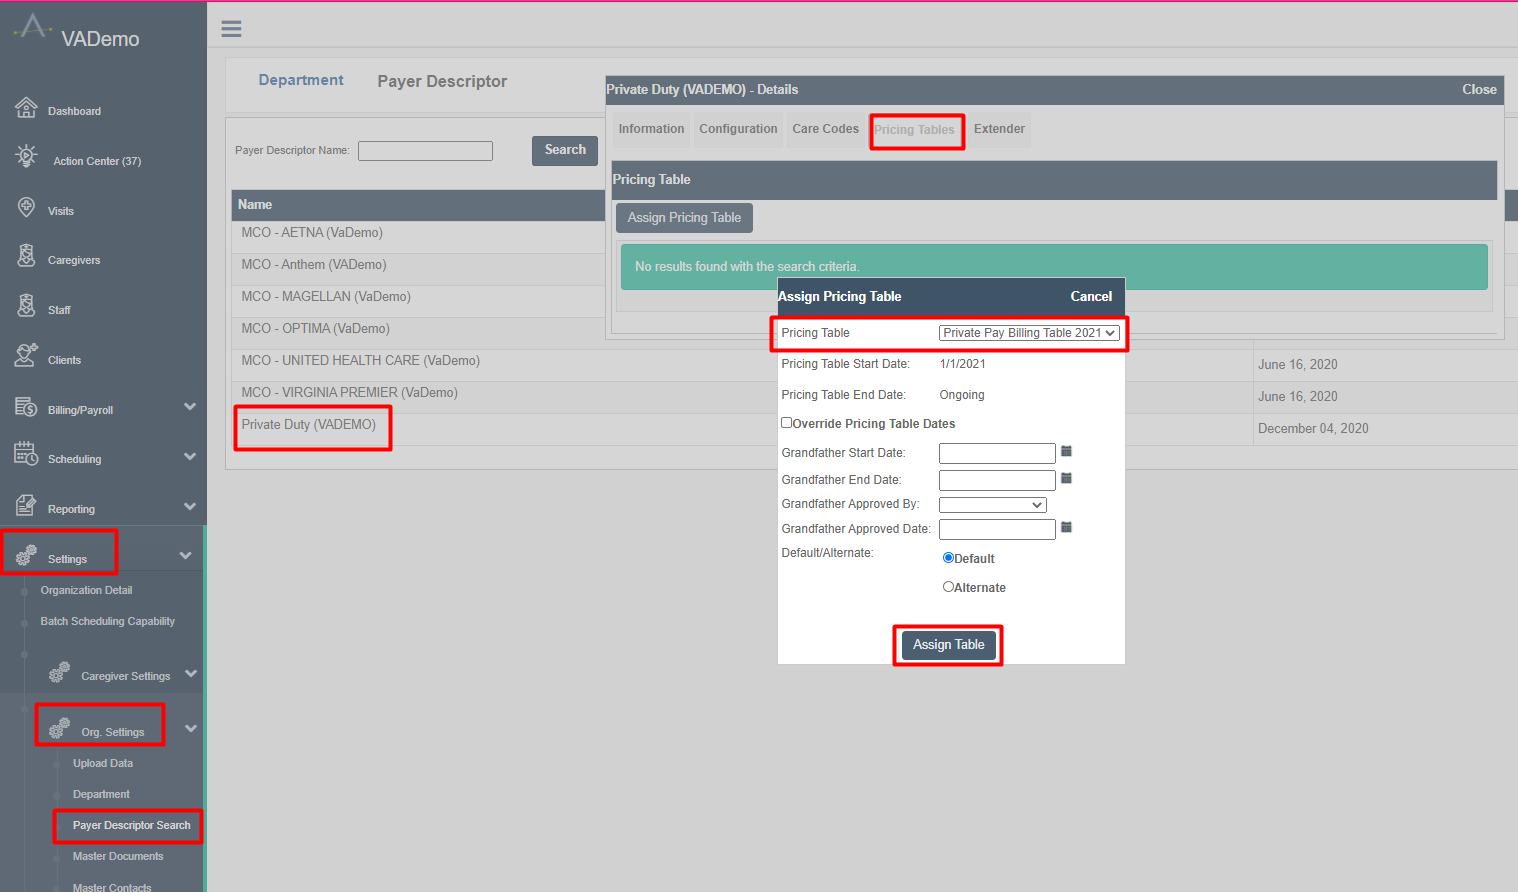
Go to Settings, Org. Settings, Payer Descriptor (or Payer Descriptor Search, or Agency, depending on the environment). Click the appropriate payer, click the pricing tables tab, and then assign the appropriate pricing table. Normally there is no need to add any special settings besides selecting the pricing table itself.
Applying Bill Rates to Individual Clients (via billing tables)
Some companies use individualized client bill rates. These bill codes are created, assigned to a billing table, and then the billing table is named something like "$35.00 Private Pay Bill Rate." The process of building that bill code and billing table are described above.
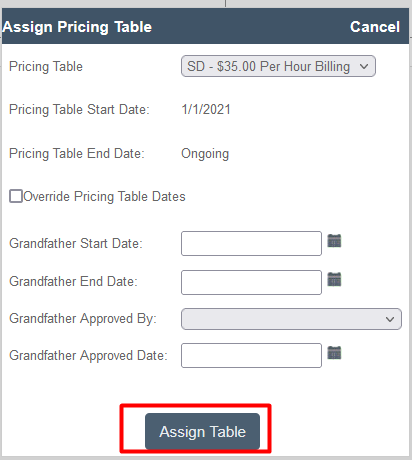
To assign an individualized billing table to a client:
- Open the client's individual profile page
- Click on the Pricing Table tab (may be renamed Billing Rate or Individualized Billing Rates)
- Select the appropriate pricing table
- Click Assign table
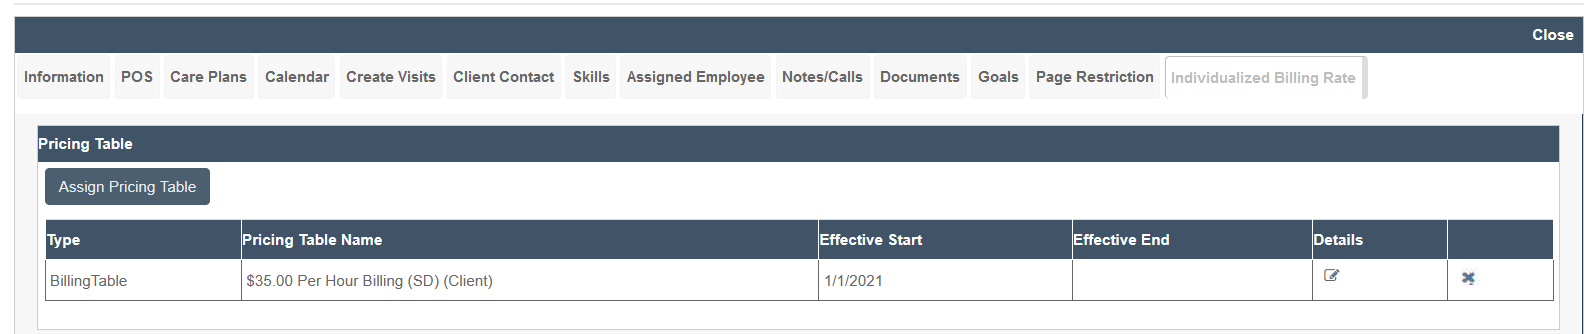
The billing rate is assigned to this client and reflected on this tab.
Changing Bill Rates - Guides
Please note billing rates are the responsibility of the organization. Ankota Support will assist upon request.
For Clients with Bill-by-Visit Type Method
First, to create and assign the new rate:
- Create the new bill code
- Assign the bill rate to the visit type
Once this rate change is complete:
- Wait for the next day
- Make sure all visits are closed or cancelled from DATE OF RATE CHANGE through yesterday
- Clear out the Visit Approval Dashboard from DATE OF RATE CHANGE through yesterday
- Go to the Calculate Billing/Payroll page
- With the operation set to Billing, filter for DATE OF RATE CHANGE through yesterday. Be sure to put in the DATE OF RATE CHANGE start date – don't apply the new rate before then.
- Click Recalculate to pick up the changes and apply the new billing rate to that date range. (Don't recalculate any visits before DATE OF RATE CHANGE.)
For Clients with Billing Tables
First, to create and assign the new rate:
- Create the new bill code
- Time out the old billing table
- Create a new billing table and assign the rate to the billing table (don't forget to set the correct date range)
- Assign the billing table as needed:
- Assign billing table to client
- Assign billing table to payer descriptor
If this rate change is in the future, the rate changes will be applied automatically.
If this rate change is in the past:
- Wait for the next day
- Make sure all visits are closed or cancelled from DATE OF RATE CHANGE through yesterday
- Clear out the Visit Approval Dashboard from DATE OF RATE CHANGE through yesterday
- Go to the Calculate Billing/Payroll page
- With the operation set to Billing, filter for DATE OF RATE CHANGE through yesterday
- Click Recalculate to pick up the changes and apply the new billing rate to that date range.